Best Stretches for Surfers

Best Stretches for Surfers

BEST STRETCHES FOR SURFERS

Stretching

Stretching before and especial after a surf session is vital for getting the best out of your surfing performance,  The best stretches for surfers should help in a range of movements as well as better long-term contractions of your muscles which will help to decrease the risk of cramping up or injury.

It’s also crucial to your recovery from surfing as will help your muscles to recover quicker and be ready for the next surf. Its important to keep in mind to do very light stretching before a surf and try to maximize the time to 7-10 seconds per stretch, Longer stretches should be done after a surf, slowly bringing your muscles back to a normal state.  When stretching after your surf, try to hold the stretch for a minimum of 12-15 seconds.

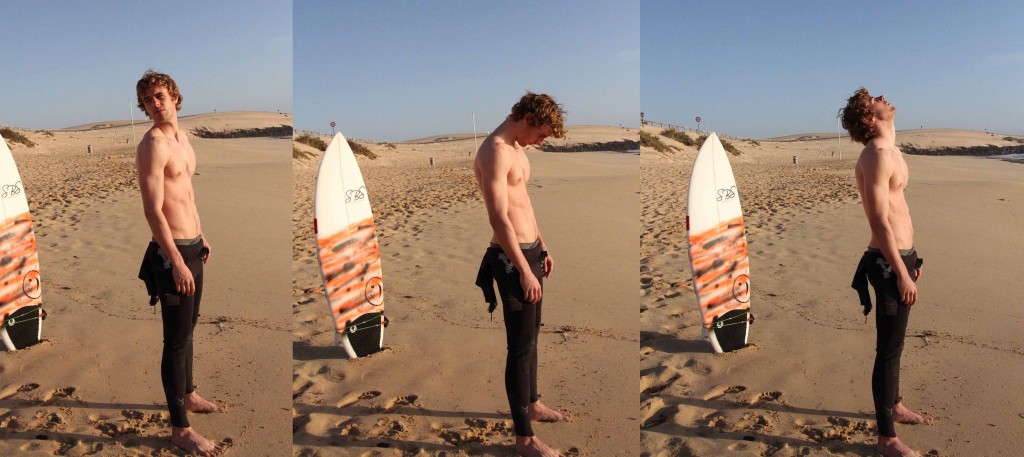
Stretch: Side Neck stretch

1111


How to perform:S tart with your shoulders relaxed, gently tilt your head towards your shoulder. Assist stretch with a gentle pull on the side of the head if need be.

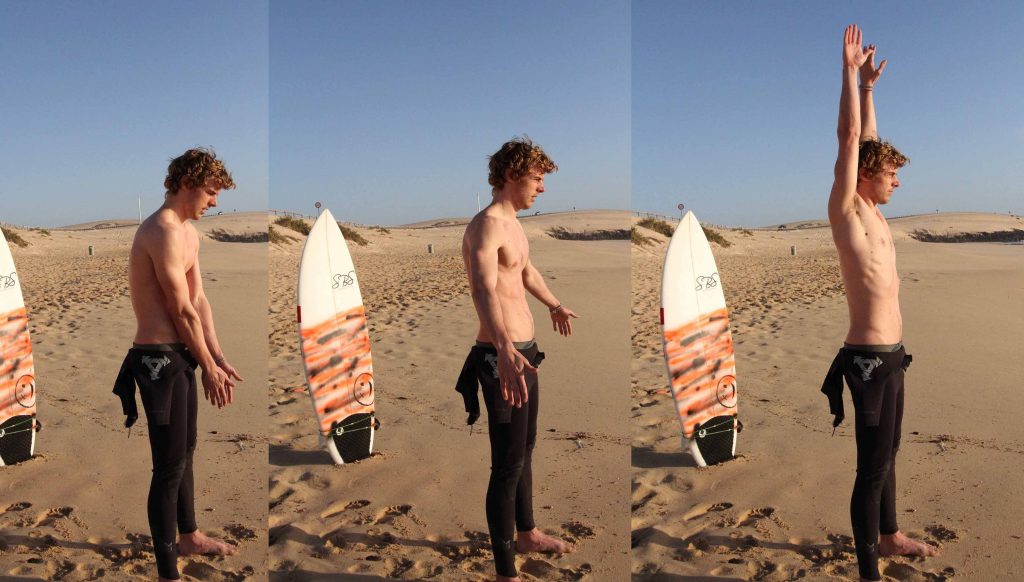
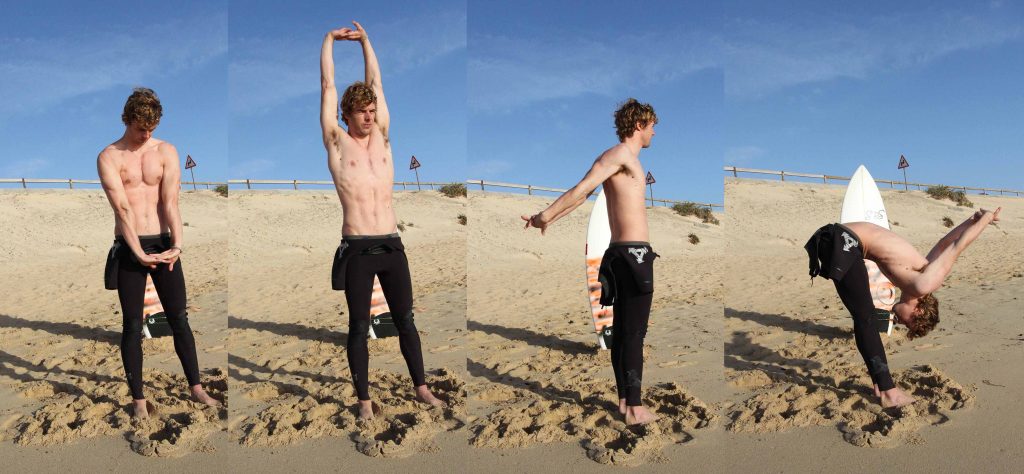
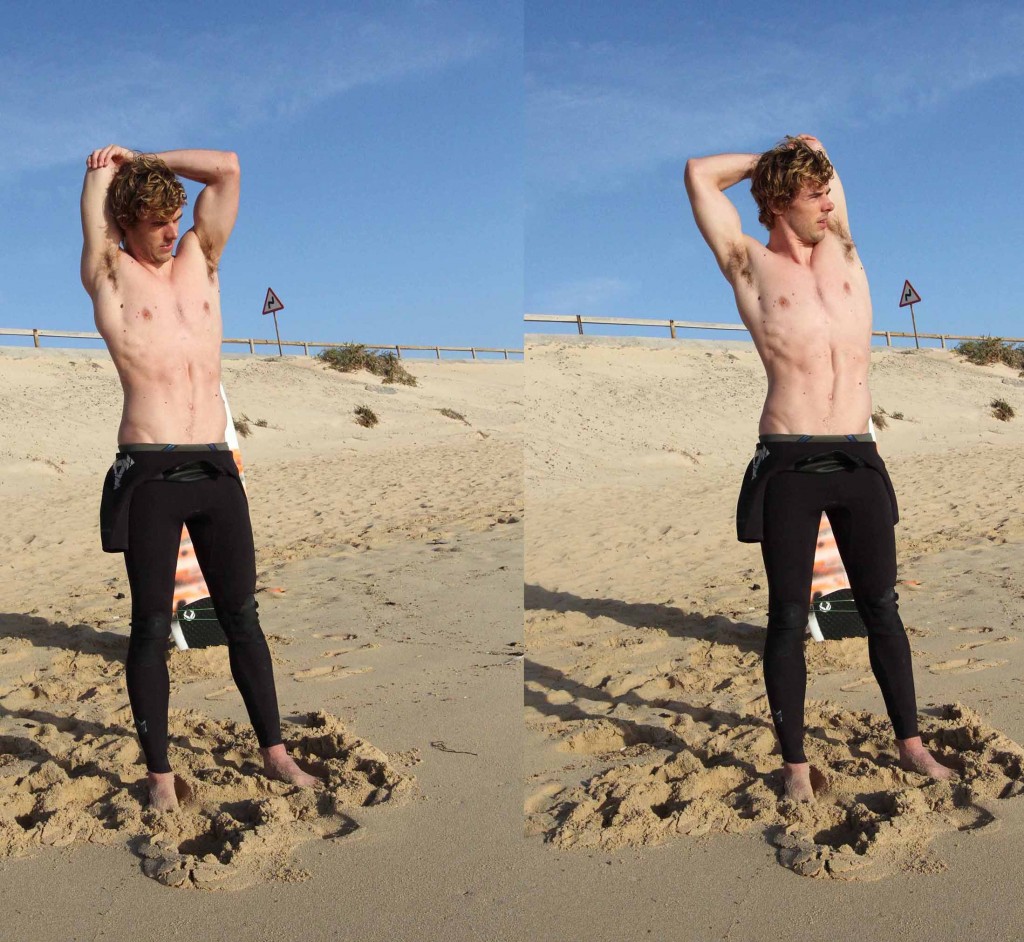
Stretch: Static Overhead stretch

1114

How to perform:S tanding straight up, start with your hand by your waist and slowly bring them above your head. Keep your shoulders down as you extend your arms upand holf as hight as you can for 12-15 seconds.

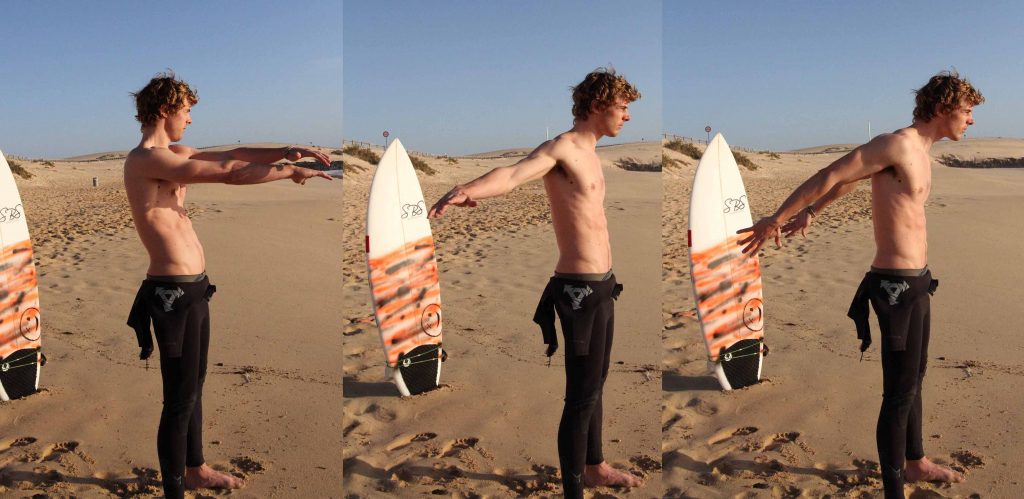
Stretch: Static chest stretch

1113

How to perform: Stand with your hands together, arms extended directly in front of you. This will be your starting position. Keeping your arms straight, for 12-15 seconds then move your arms back as far as possible and hold them together as straight as you can  for 12-15 seconds.

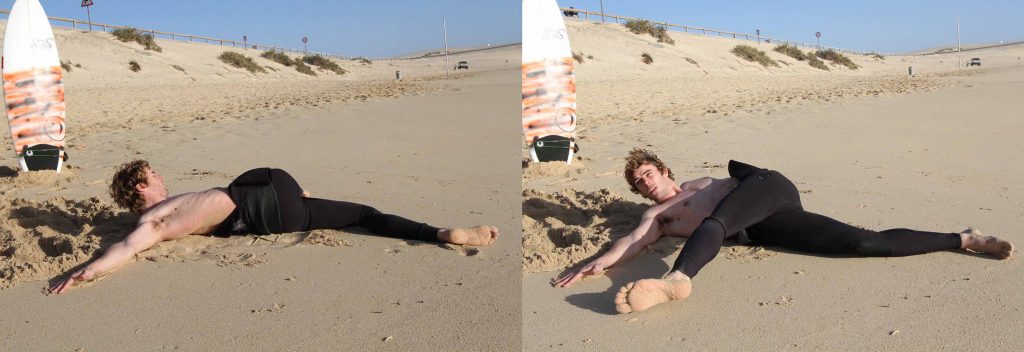
Stretch: lying cross over “knee across body”

2024

How to perform: Lie on your back with your legs extended. Cross one leg over your body with the knee bent, attempting to touch the knee to the ground. Your partner should kneel beside you, holding your shoulder down with one hand and controlling the crossed leg with the other. This will be your starting position. Attempt to raise the bent knee off of the ground as your partner prevents any actual movement. relax the leg repeat with the other side.

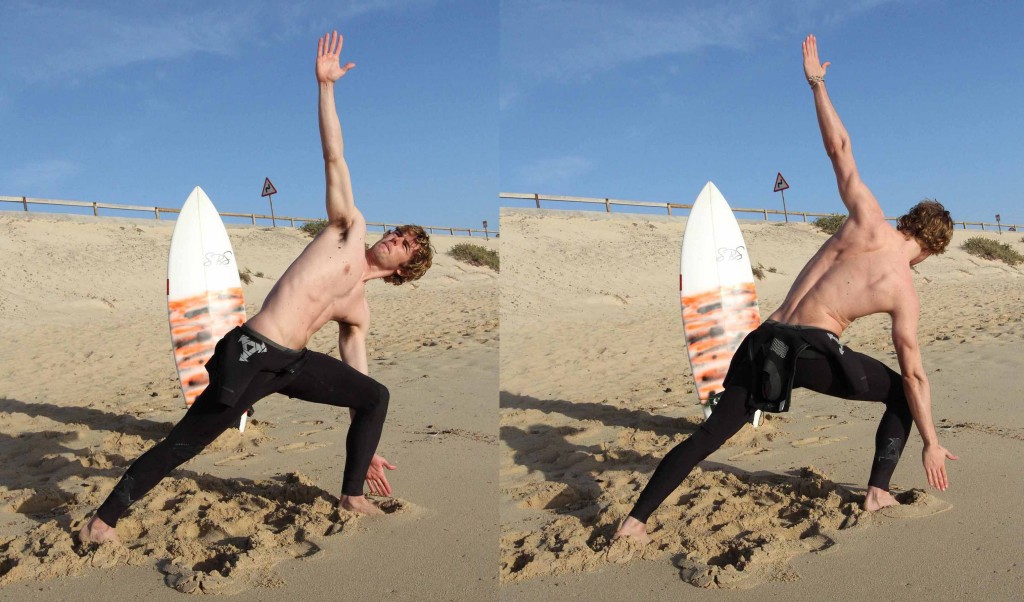
Stretch: Cross over reverse lunge

2020

How to perform: Stand with your feet shoulder width apart. This will be your starting position. Perform a rear lunge by stepping back with one foot and flexing the hips and front knee. As you do so, rotate your torso across the front leg. After a brief pause, return to the starting position and repeat on the other side, continuing in an alternating fashion.

Stretch: High Lunge

2017

How to perform: . High Lunge: Benefits: Stretches and strengthens your legs, especially thighs, knees, ankles and psoas muscle; opens the groins and hips, and lengthens the spine. Benefits: Stretches and strengthens your legs, especially thighs, knees, ankles and psoas muscle; opens the groins and hips, and lengthens the spine.

Benefits: Releases tight hips, hamstrings and back muscles.

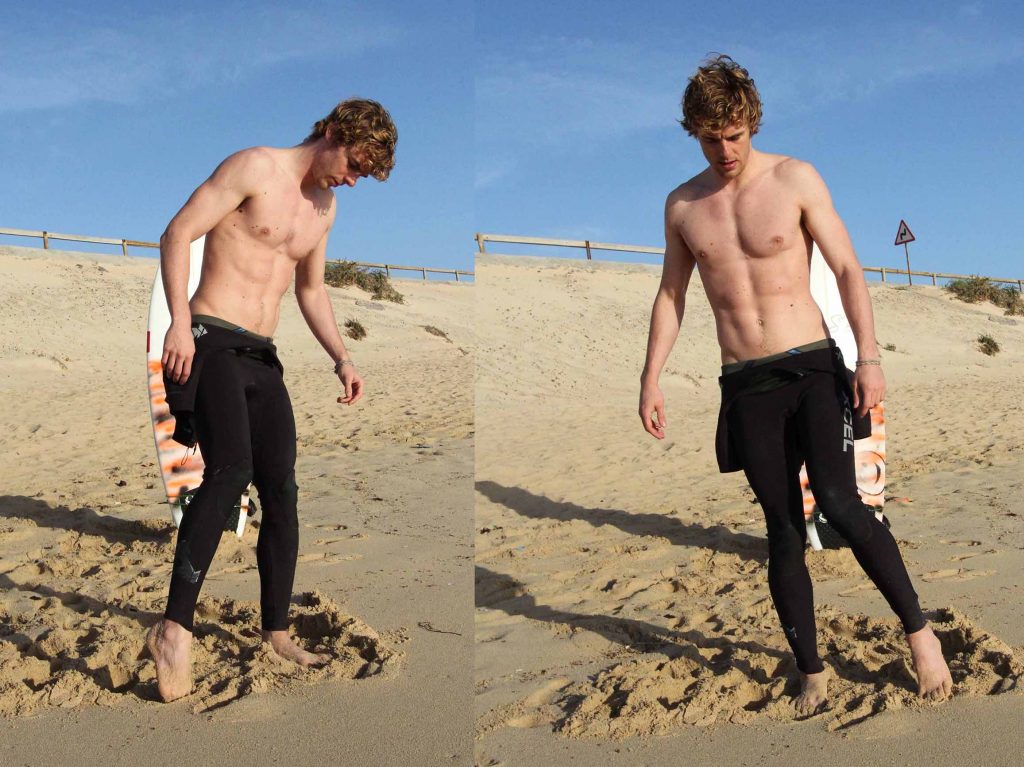
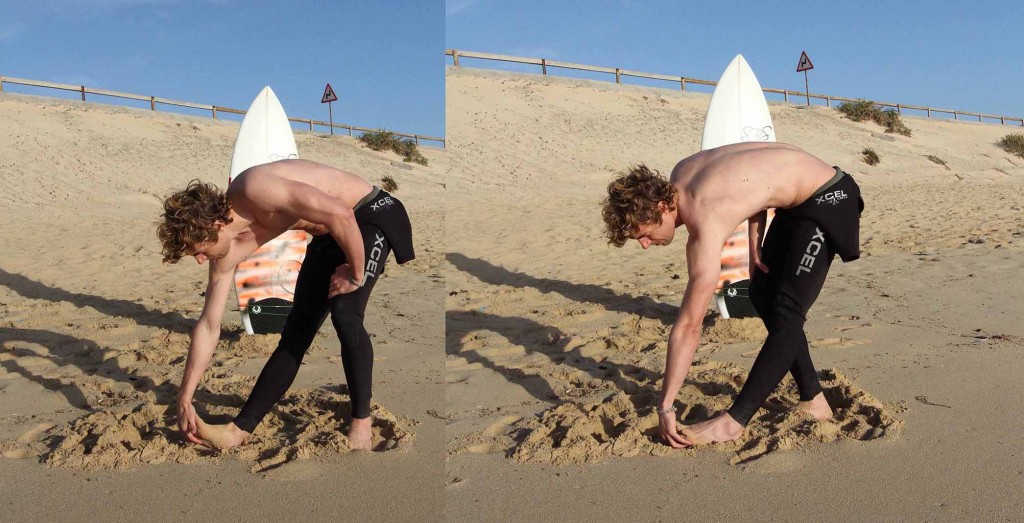
Stretch: Standing Toe Touch

2016

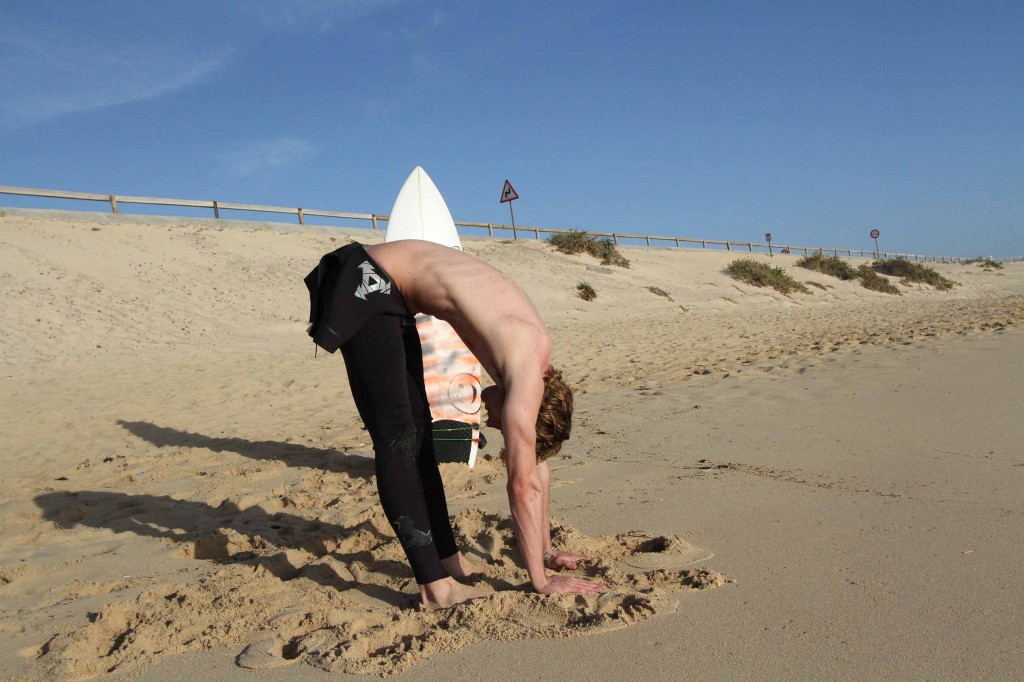
How to perform: Stand with some space in front and behind you. Bend at the waist, keeping your legs straight; until you can relax and let your upper body hang down in front of you. Let your arms and hands hang down naturally. Hold for 10 to 20 seconds.

Improves the flexibility of the spine which is important for long paddle outs. stretches the shoulders and the backs of the legs, which will allow your surfing stance to be more relaxed.

Stretch: Hip gluteus stretch

2013

How to perform: The gluteus are dominant in most lower-body power moves. Go to the bottom of a lunge and place your back knee on the ground. Slide your front foot forward and drop the knee out to the side. Place your hands on the ground on either side of the foot. Lower your chest towards the ground. Lean down further to increase the stretch. Hold for 12-15 seconds then change.

Stretch: Back Stretch/ Cat Stretch/ Kneeling Quad Stretch / On Your back Quad Stretch

2014

How to perform:

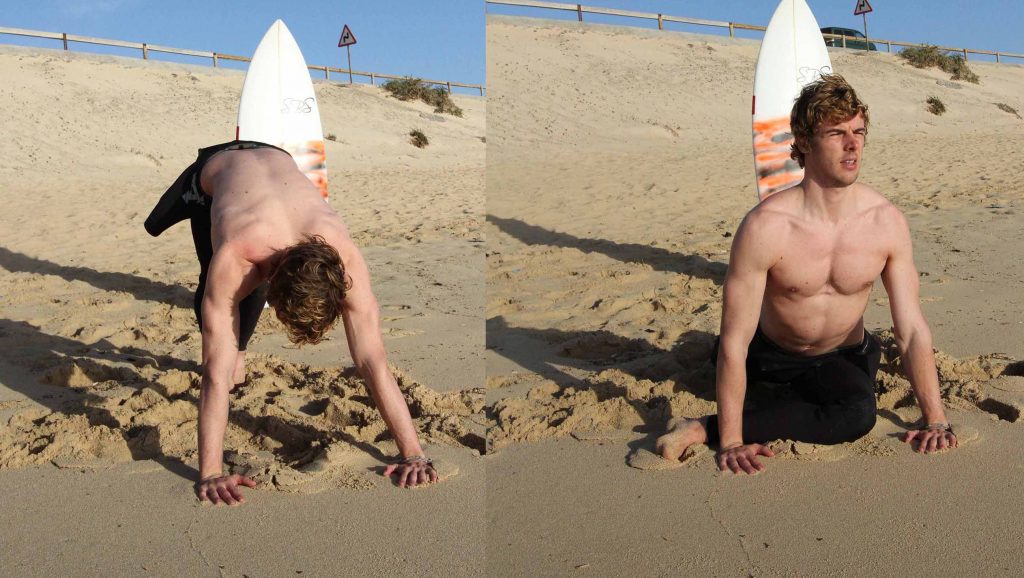
  1. Start with your hand on the floor shoulder with apart in a kneeling position; slowly maintain the actual natural curve from the spine, down their back. Hold the stretch for 12-15 seconds.

  2. Start with yourself on the floor on your hands and knees. Pull your belly in and round your spine, lower back, shoulders, and neck, letting your head drop. Hold for 15 seconds.

  3. Kneel on the floor, holding your heels with both hands. Push your buttocks up and forward while bringing your head back to look up at the ceiling, to give an arch in your back. hold for 12-15 seconds.

  1. Lie flat on the floor, and hang one leg and arm over the side. Bend the knee and hold the top of the foot. As you do this, be careful not to arch your lower back.

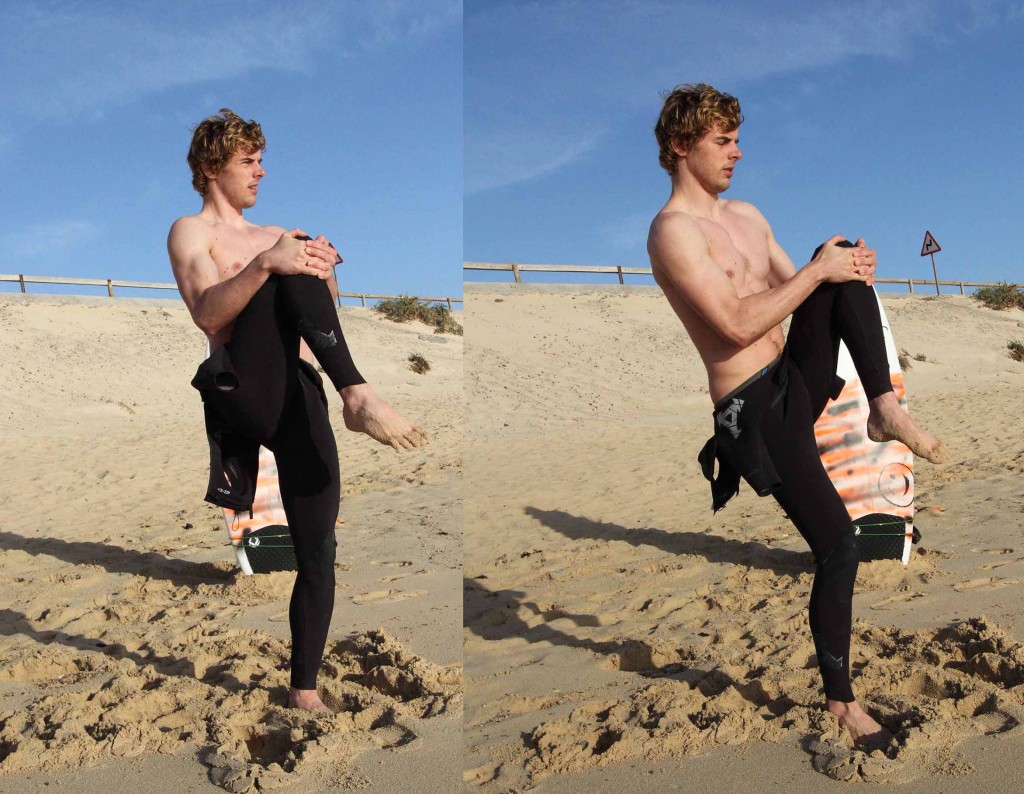
Stretch: Standing Knee To Chest

2011

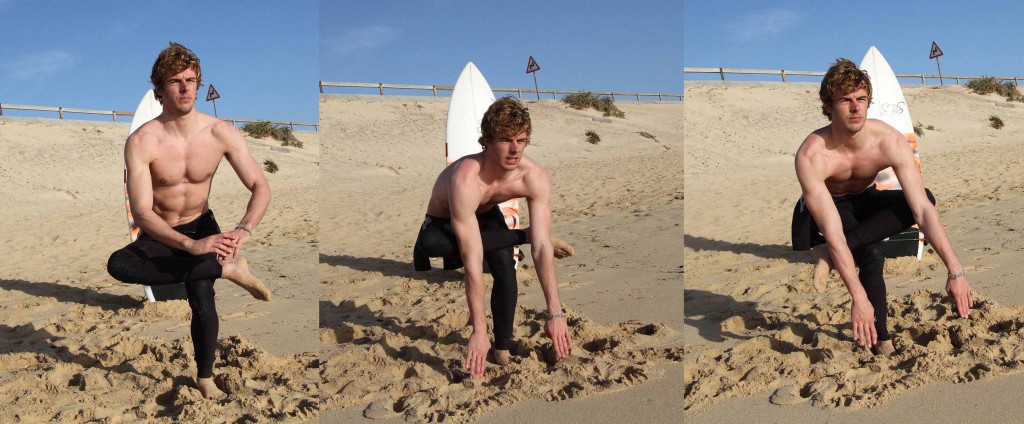
How to perform: Helps to relieve tight hip muscles and lower back and increase the range of motion particulary helping flexing of the knee, start in a balanced standing position gently raise one bent knee up enough so you can grasp your lower leg with both hands. Gently pull your bent knee toward your trunk using your hands. Relax your legs, pelvis and low back as much as you can while you pull. Hold for 12-15 seconds return leg to the floor, repeat on other side.

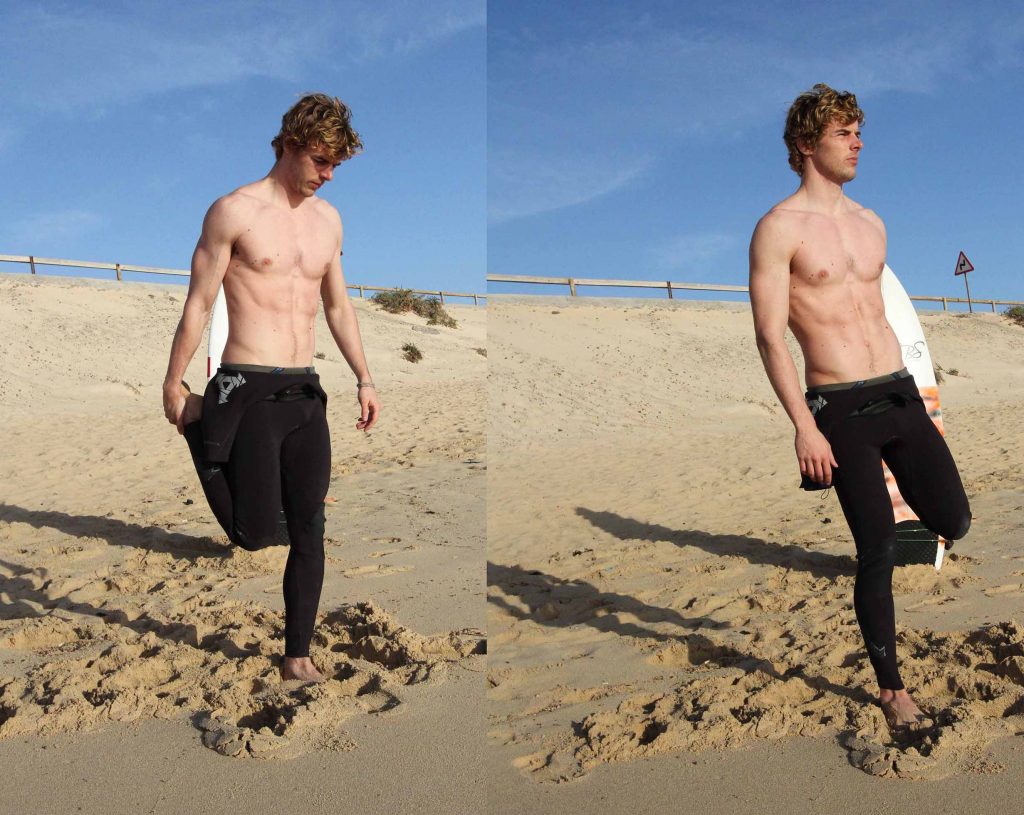
Stretch: Standing Quadriceps

2010

How to perform: Boat Pose: Benefits: Strengthens your core, and helps with deep breathing.

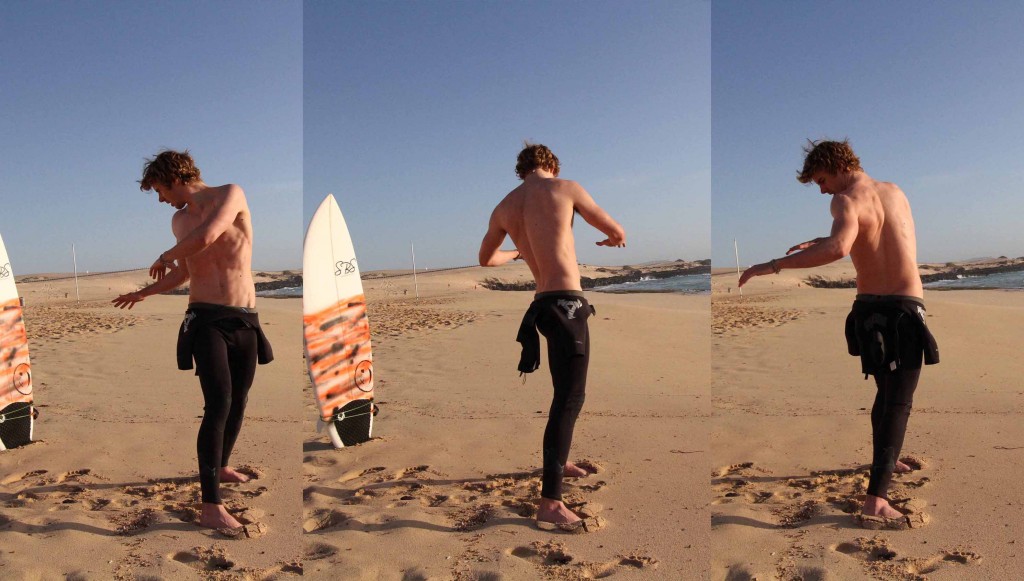
Stretch: Spiderman stretch

2009

How to perform: helps mobilize the hips and the spine helping in the popup and turning. Start with your feet together and hand in a “T” shape by your side and lunge forward.

Stretch: Extended arm & shoulder stretch

2007

How to perform: Start in a standing position with your fingers clasped together and thumbs pointing down push as hard to the floor as you can and slowly move your braced arms in front of your chest then up to the sky. Disconnect your finger briefly as you then reconnect behind your back making a wide circular motion. For an extra stretch lean forward.

Stretch: Triceps stretch

2006

How to perform: Reach your hand behind your head, grasp your elbow and gently pull. Hold for 10 to 20 seconds, and then switch sides.

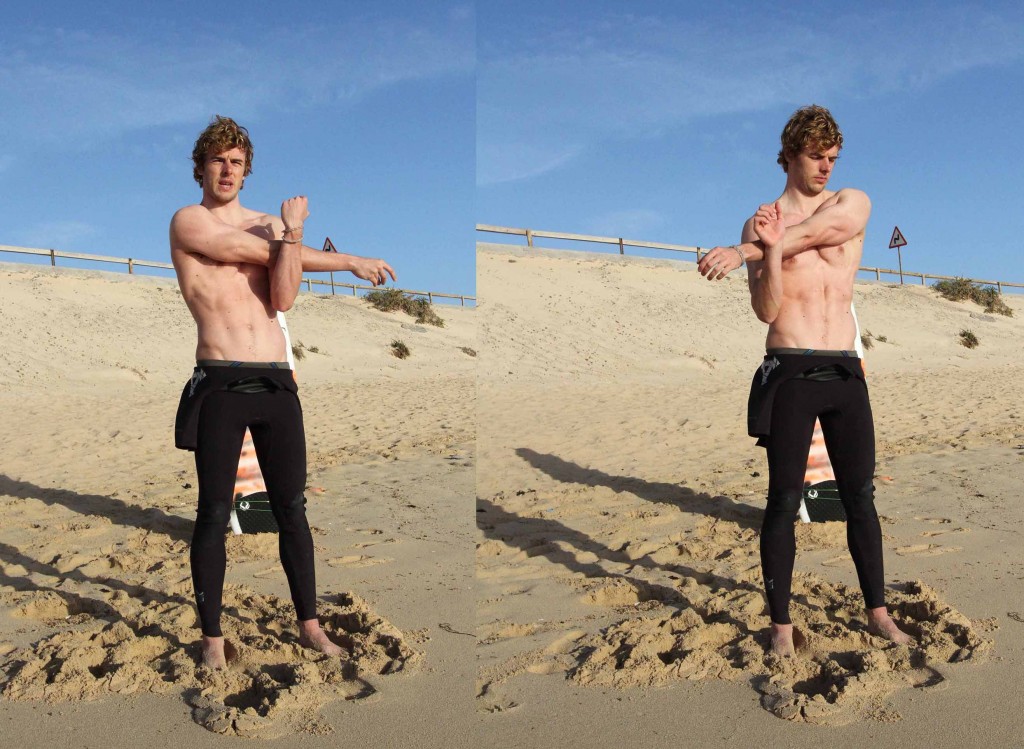
Stretch: Shoulder stretch

2005

How to perform: Reach your left arm across your body and hold it straight. With your right hand, grasp your left elbow and pull it across your body towards your chest.

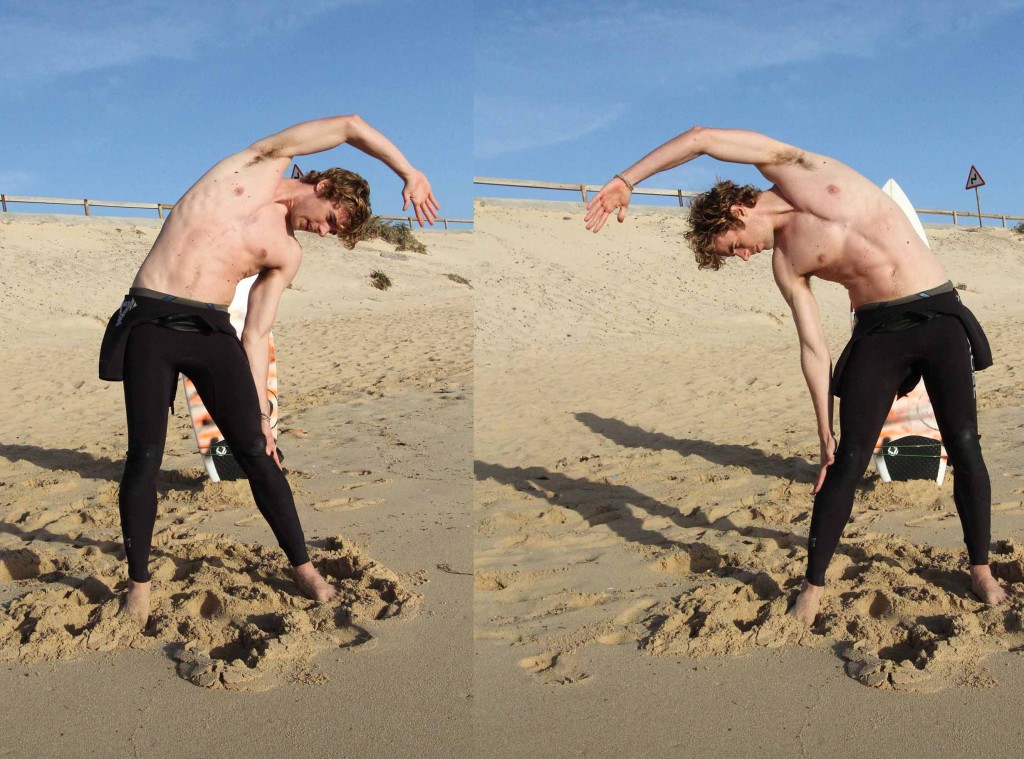
Stretch: Standing lateral stretch

2004

How to perform: Arch side – Slowly reach one arm over your head, keeping your arms in line with the hips. Take a slightly wider than hip distance stance with your knees slightly bent. Place your right hand on your right hip to support the spine.

Raise your left arm in a vertical line and place your left hand behind your head. Keep it there as you incline your torso to the right. Keep your weight evenly distributed between both legs (don’t lean into your left hip). Switch sides.

 Stretch: Foot twirl

2002

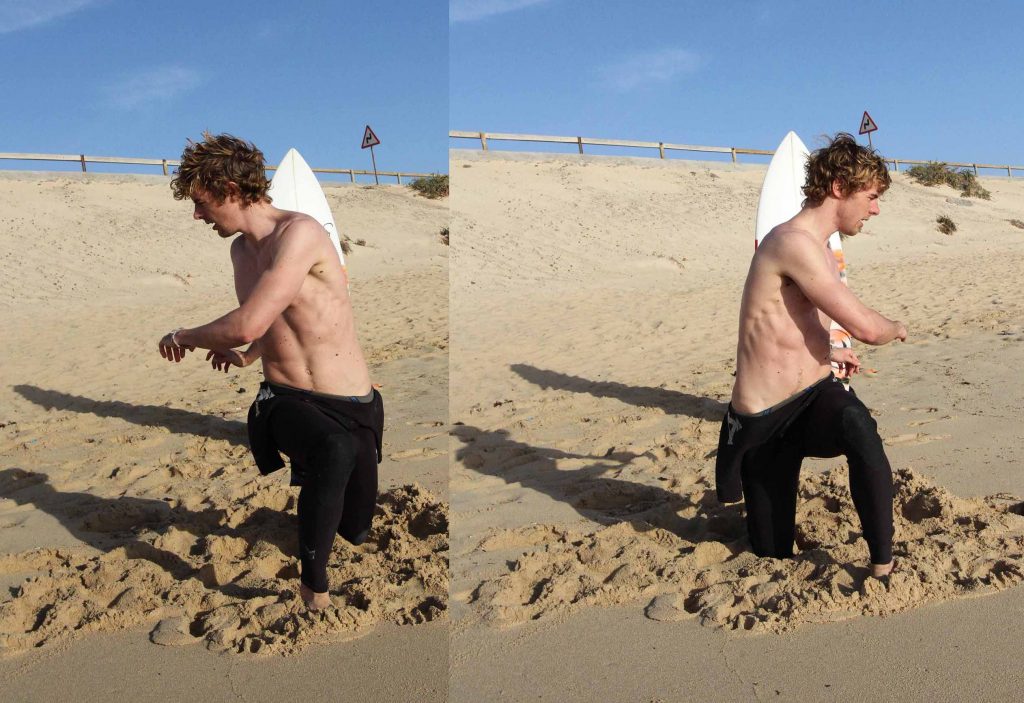
How to perform: Lift the right leg in the air (just around 2 inches from the floor) and perform a circular motion with the big toe. Pretend that you are drawing a big circle with it. Tip: One circle equals 1 repetition. Breathe normally as you perform the movement. When you are done with the right foot repeat with the left leg.

Stretch: Standing hamstring and calf stretch

2001

How to perform: Hamstrings – The hamstring stretch is a great post surfing stretch, use it very lightly as a pre surf movement. Sit up straight on an exercise mat. Bend one knee and put that foot on the floor to stabilize the torso. Straighten your other leg and flex your ankle. Using a band, towel, or your hand if you can reach, pulls the toes toward you. Hold for 10 to 20 seconds, and then switch sides.

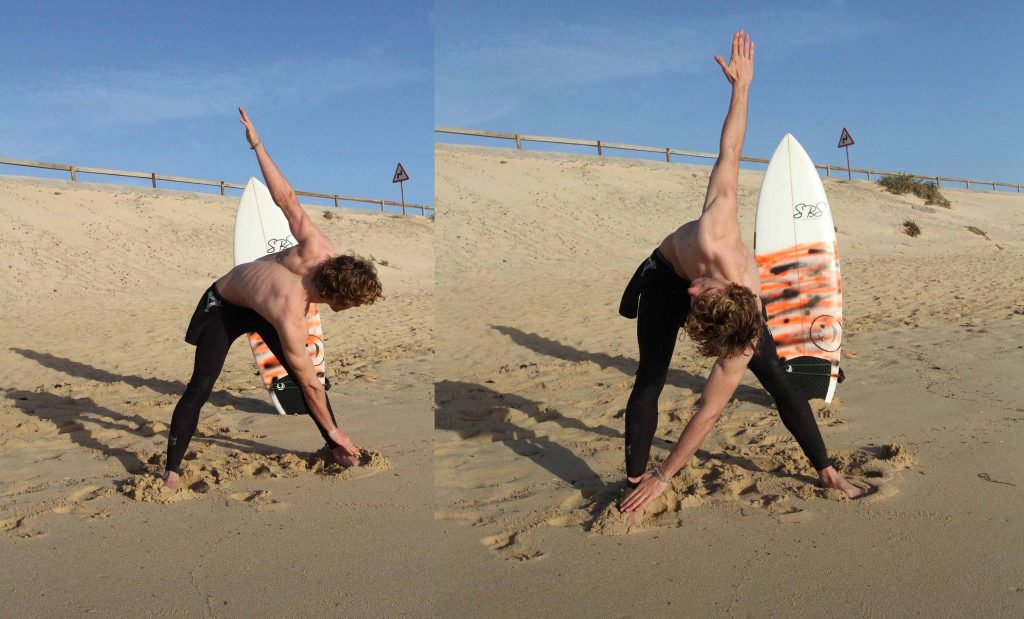
Stretch: Alternative To touches

1116

How to perform: stand with your feet slightly wider than shoulder width apart bend down and try and touch your left foot with your right arm and then switch and repeat with the other foot do 8-10 reps.

Stretch: Torso Rotations

1115

How to perform: Stand upright holding an exercise ball with both hands. Extend your arms so the ball is straight out in front of you. This will be your starting position. Rotate your torso to one side, keeping your eyes looking at your hands and hold for 12-15 seconds. Now, rotate back to the opposite direction. Repeat for 10-20 repetitions.


Related Posts

SUP MAG Review – The Longbow

SUP MAG Review – The Longbow

The Don is our big board for big distances, its our high performance SUP for touring, fitness, and racing. Its all-around streamline design is perfect for flat-water performance, recreational users as well as open ocean long distance competitors looking for a board...
10 Essentials For Cold Water Surfing

10 Essentials For Cold Water Surfing

When winter rolls around you know that the waves come in “usually”. This means cold waters heading your way. Surfing in the winter can be great or awful depending on how prepared you are. Don't let the cold stop you from having an awesome surf. Whether you're a...

Best 2019 NEW Surfboards

Best 2019 NEW Surfboards

In 2019 SBS Boards are bringing you the very best in our NEW surfboard range with some brand new construction using our full flex and rapid flex technology aswell as some brand new shapes and designs just for 2019 we have revamped and improved our classic favourites...

HOW TO NOT BE A KOOK

HOW TO NOT BE A KOOK

 HOW TO KNOW IF YOUR A KOOK Other Sports you may be called a poser. Someone pretending to be better than he/she is and is very clear to see after a short period of time they're definitely not as good as they think SO WHAT IS A KOOK?  Surfers seem to have their own...

What A Vegan Surfer Eats In 1 Day

What A Vegan Surfer Eats In 1 Day

With the growing movement of veganism in the UK and the rest of the world, we wanted to explore what it means to be a vegan surfer in the UK. as our video above shows one of our team rider JACK and what he eats in a day as a vegan surfer in the UK Veganism has quite...

Should All Surfers Be VEGAN?

Should All Surfers Be VEGAN?

With so much hype about the environment and Veganism in the news and media, we wanted to ask the question: Should all surfers be Vegan?  Veganism has grown massively around the world in the last few years, in increase in popularity has been especially noticeable here...

Beginners Guide to Buying a Surfboard

Beginners Guide to Buying a Surfboard

beginners guide to buying a surfboard

Beginners guide to choosing the right surfboard

So you got the bug and you decided to buy your first surfboard you have a couple of goes and looking to make that first purchase and commit to the surfing life style, but what one to buy?, One of the most common questions asked by beginners. Whatever your level of surfing experience, is getting the right board for your skill level, this is crucial to you progression in surfing

Surfing is personal to everyone and with today’s ever increasing variety in choice of boards, styles and materials, It can be difficult to pinpoint your perfect board. Below we have given you a rough board guide to what boards would be suitable for your progression subject to personal interpretation, depending on how much you surf.

When buying a surfboard it’s always a good idea to try to get some expert advice either from a surf coach/instructor a local board shop or an experience friend as they will be able to gauge a better idea of you surfing level, local conditions and needs. This being said whenever buying a new board it good to keep in mind 3 key principles that will make a big difference to your surfing success

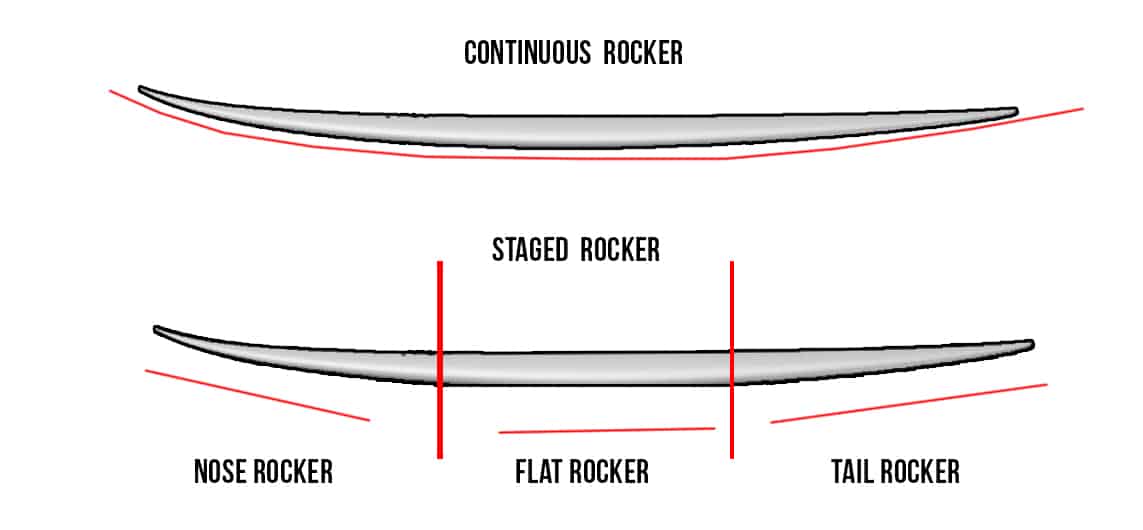
Rocker

rockers 1

A higher or increased nose rocker is usually attributed to boards designed for bigger-more hallow waves. More rocker in the nose allows for a shape that will not “pearl” or plunge into a large, steep wave face when you dropping in were as a flatter more relaxed rocker will help the board to plane quicker and more efficiently, but it will reduce manoeuvrability and increase chance of pearling on take off.

Increased tail rocker can be found in boards shaped for optimal manoeuvrability. A tail that bends off of the water’s surface provides more lift and sensitivity in the tail for driving through radical turns.

Generally speaking, on your standard surfboard, less overall center rocker means the board will glide and paddle better and be more suitable for beginners. More rocker will accommodate intermediate and experienced surfers looking to use every area of the board in order to generate speed and turning power. Aggressive surfers may seek more rocker in their bigger wave boards because the curvature of the nose allows for late drops on consequential waves.

Volume

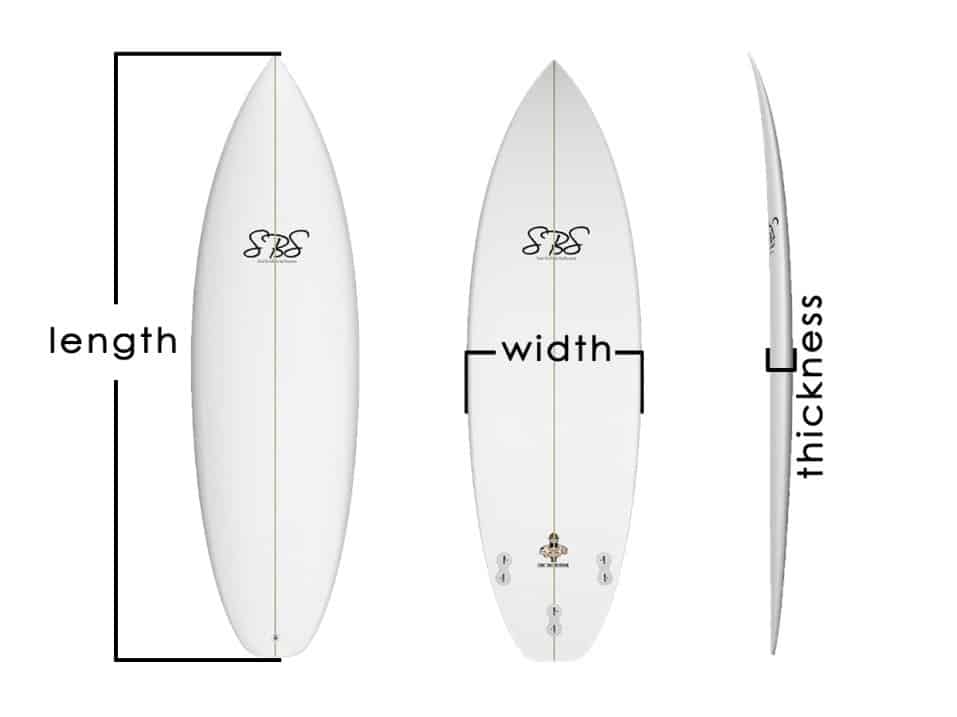
Volume: the amount of space a surfboard occupies, usually expressed in cubic litres (i.e., 35 CL’s). Basically, the surfboards [length x width x thickness] will yield the volume of a surfboard. However, the key to the placement of the volume, as well as the surfboard’s foil, affects the overall volume of a surfboard greatly.

rockers 2

Volume at its fundamentals can be displaced in a variety of ways in a surfboard e; a 6’6 good wave shortboard can easily have less volume than a 5’6 groveller surfboard. Knowing the right volume for you – a subjective combination of personal preference, body weight, experience, age, fitness, skill level, riding style, etc. – will ensure that you don’t buy a surfboard with too much or too little volume.

To get a rough guide on the volume you need check out our volume calculator

Too little volume on your board means you won’t catch as many waves and will have trouble generating speed this is because of increasing resistance (Drag). Too much volume means the board will feel bulky, hard to transition and turn. But will have less drag and be easier to paddle and catch waves as well as achieving planning speed with less velocity. The more drag you have, the less acceleration you’ll have. Surfers know this intuitively. How many waves have you paddles for and missed just barely, by a half stroke? With a little more volume and little less rocker to help with speed Imagine how many more waves you can catch.

Length

Length of a surfboard is the distance from the nose to the tail of a board. Length can be hugely critical to a surfer’s progression as many beginners make the classic mistake of buying a board too short for them limiting their progression and success in surfing

A few other Considerations to think about when buying a board…

Durability– as a beginner you may hit things with your board or fall on it, so you want to make sure that your board is durable

Practicality will it fit in your car, do you have some were to store it

Manoeuvrability– being able to hold you board under your arm or on your hard and even the right weight can all affect manoeuvrability in and out of the water

Progression– if you’re lucky and are planning on surfing every day think about buying a board that you can progress with. Or if you’re going to surf 1-2 times a year think about a board that will allow you to have fun for in that time.

Fins – as a beginner 3 fins (thruster set up) or a single fins will be adequate also make sure that your fins match the fin boxed of your board i.e. (FCS, Future fins)

So what should I look for?

sbsboard 33

Length

This is pretty important between 6’8″ to 8 ft long as a beginner “depending on your height”. Try to keep it about a foot to a foot and a half taller than you.

Width

Wider the better. The wider the surfboard the more stable it will be the easier it will be to ride and stand, anything from 20 to 22 inches across, you want to be able sort of fit it underneath your arm, of course this won’t be possible if you got short arms.

Thickness This is important because the thicker the surfboard the more buoyant it is and it will be easier to paddle. Stay within 2-1/4 to 3 inches thick dependent on your weight.

If you are a small person then the thickness can be around 2 to 2 1/2 inches

If you are average size then go for something 2 1/2 to 2 3/4 inches.

If you are a big dude then 3 inches should float you.

Don’t get something to big and thick because then you will have a very hard time maneuvering it around.

A rough guide to what surfboards would-be a good idea

  • “I only surf 1-2 days a year” = Foamboard
  • “I surf about 5-7 days a year” = Foamboard, Longboard, Minimal
  • “I surf at least once a month” = Longboard, Minimal, Magic Carpet
  • “I surf a few days a month” = Longboard, Minimal, Magic Carpet or Fish big shortboard, Grovler.
  • “I surf every week” = Longboard, Minimal, Magic Carpet, Fish or Big Shortboard, Grovler performance shortboard


Best Surfboard for a beginner.

Depending on you height weight and skill level you will want something with the following quality’s

  1. Long
  2. Wide
  3. High volume (depending on your weight and weight) Check our Volume calculator to find your perfect volume (Button )
  4. stable
  5. easy to catch waves
  6. easy to paddle
  7. easy to control

A great first time beginner board would be either a “soft top” or a “mini mall” board.

Choosing the right surfboard for you

Foam Board/ Foamie: Length 7ft – 9ft

Pros

  • Cheap to buy (Lost of secondhand surf school boards available)
  • Soft Safe – if it hits you won’t hurt like a hard board
  • You can surf white-water
  • Easy to catch most waves
  • Perfect for surfers surfing one or twice a year

Cons

  • Weight – holding can be quite difficult for big and heavy
  • Larger boards harder to transport
  • Can absorb a lot of water
  • Not much cheaper than hard surfboards
  • Not ideal for surfing over shoulder-high waves
  • Can be difficult to paddle out on when surf is bigger
  • Wont last as long as a fiberglass or epoxy boards.

Longboard: Length 8ft – 9ft+

Pros

  • Fast track progression, your learning to surf a hard board
  • More responsive, faster and more maneuverable than foam boards
  • Can learn to do longboard moves – like cross stepping, hanging 5 etc
  • Able to surf in bigger waves above head high
  • Holds its re-sale value well.
  • Always great to have a longboard for smaller summer conditions.

Cons

  • Difficult to fit in most cars if it’s over 8ft
  • Heavier and bulky to carry item to carry
  • Hard surfboard means it’s going to hurt more than a foam board if it hits you
  • Can be more difficult to catch waves than a foam board
  • Can be difficult to transport on airplanes because of their length
  • Good for unbroken ‘green’ waves not as great in the whitewater

Mini-Mal Surfboards: Length 7’0 – 8’0

Pros

  • Smaller than longboard, easier to carry
  • Fits in to most small cars
  • Easier to paddle out in bigger surf than a large foam board
  • Likely to progress your surfing a little faster and improve paddle fitness
  • Epoxy versions can be very durable.
  • Good resale value. Small amount of depreciation from new
  • Long term investment, you can surf minimal forever and perfect for smaller days
  • Possible to take on planes

Cons

  • Harder to catch waves than a longboard or foamie
  • Size – Can be difficult to get out back in overhead high
  • Not as fast as smaller surfboards

Fun Board “Magic Carpet”: Length 6’10 – 7’2

Pros

  • Similar to minimals, but smaller, fun boards/ Magic Carpet are
  • Very stable easy to balance
  • Single fin and thruster options available
  • Easy to carry Lighter than large longboards and foamies
  • Slightly smaller than minimals, can be faster/ easier to paddle out back in bigger conditions
  • Good wave range from knee-high to overhead high surf
  • Small enough to be allowed on most airlines if you travel
  • Progressive enough that you could carry on surfing this type of board for a long time
  • Popular boards with the general surfing public, so hold resale value well.
  • Small enough to fit in most cars

Cons

  • Less volume than a longboard so requires more effort to catch waves
  • Can be a more challenging board to learn on for complete beginners than a longboard
  • Difficult to rider on steeper more hallow waves because of flatter rocker and wider nose
  • Not as fast or as maneuverable as shortboards/ have quite a big turning radius.

Large Fish Surfboard: Length 6’4 +

Pros

  • Lots of cool designs available at affordable prices
  • Faster and more maneuverable than the other boards covered above (longboards, foamies, minimals and magic carpets)
  • Relatively light and easy to carry
  • Easier to duck dive under waves when paddling out
  • Epoxy versions can be durable
  • Can surf small waist-high to overhead waves
  • If a beginner can surf a fish then it might be the only board they ever want
  • Twin fin, tri 3 fin thruster and quad versions are available
  • Small enough to be allowed on most airlines

Cons

  • More difficult to catch waves compared to a with larger boards
  • Lower wave count for beginners likely. Need to be able to catch unbroken green waves to get the most out of a fish not designed to catch white water with
  • Be proficient at duck diving to help get under waves when paddling out.
  • Non – epoxy versions get damaged quite easily particular on the nose and fishtail.


‘Big’ Shortboards /Guns /Step ups – 6’6 to 7’2+

Pros

  • Fast and easier to turn than longer boards#
  • Able to catch bigger waves without sacrificing short board performance
  • Lightweight and so easier to carry around
  • Will fit in cars easily
  • Easier to duck dive out in bigger surf
  • Epoxy versions can be durable
  • Small enough to be allowed on most airlines
  • Tri (3) fin thruster and quad versions are available

Cons

  • Harder to catch waves and paddle. Lower wave count for beginners
  • Beginners might struggle, shortboards are mainly designed for surfing bigger waves – chest to head high+
  • Ability to catch unbroken green waves, not designed to catch white water
  • Need to be able to duck dive to be able to get under waves when paddling out.
  • Ability to turn and generate speed on a shortboard is key.
  • resale value less compared to some of the other boards.

Performance Shortboards 6’6 – 5’10

Pros

  • Fast light and very responsive, easy to turn
  • Lightweight and so easier to carry around
  • Perfect for high performance surfing
  • Will fit in cars easily easy to travel with on airplanes
  • Easier to duck dive out in bigger surf
  • Epoxy versions can be durable
  • Variations of Tri (3) fin thruster, and quad (4) available

Cons

  • Harder to catch waves and paddle for beginners slower paddling
  • Designed for quality unbroken green waves chest to head high+ not for whitewater
  • Need to be able to duck dive to be able to get under waves when paddling out.
  • Need good balance to maintain stability
  • Good Ability to turn and generate speed, to keep you the power zone and the board planning
  • Can have weaker resale value compared to some of the other boards.
  • Looks the cool but hardest to surf

Grovelers  Shortboards  6’2 – 5’4

Pros

  • Designed for high performance surfing in small waves (up to shoulder height)
  • Fast light and very responsive, easy to turn
  • Lightweight and so easier to carry around
  • Faster and Plane better than performance shortboards in smaller waves helping to keep speed through turns
  • Will fit in cars easily easy to travel with on airplanes
  • Wider than performance shortboards easier to paddle and balance.
  • Epoxy versions can be durable
  • Variations of Tri (3) fin thruster, and quad (4) available

Cons

  • Usually has higher volume than performance board so can’t turn as hard
  • Less responsive than a high performance board
  • Harder to catch waves for beginners more time spent paddling
  • Designed for quality unbroken waves or choppy condition chest to head high+ not for whitewater or overhead high bigger waves
  • Usually Harder to duck dive in bigger waves than performance board
  • Need to be able to duck dive to be able to get under waves when paddling out.
  • Need good balance to maintain stability
  • Ability to turn and generate speed to stay in the power zone to keep the board planning
  • Can have weaker resale value compared to some of the other boards.

Conclusion

So hopefully some of this information has helped you make a decision on what board is best for you. Surfing is a challenge for a lifetime so whether you have hundreds of board or just one. It all comes back to personal preference and the waves you going to be surfing. If you still unsure always good to seek local advice as they will be able to give you firsthand knowledge of the appropriate board to get for the conditions. Remember the more you practice the better you get the more choice will become available to you.

How To Paddle a Stand Up Paddleboard “SUP”

How To Paddle a Stand Up Paddleboard “SUP”

How to Paddle a Stand Up Paddleboard


Basic Paddleboarding strokes

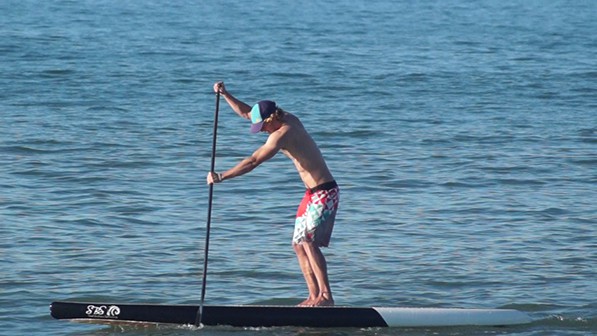
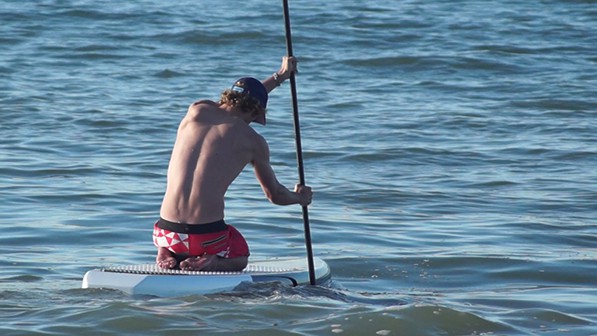
 One of the most basic parts of stand up paddle boarding is the paddling it allows you to move around in the water at speed and control. Making sure that you get the most form every stroke will be an important part of your progression. the fowling tips will aim to give advice on the best way to maximise stroke power and glide whilst minimise your effort and strain on your body.

Key point to keep in mind

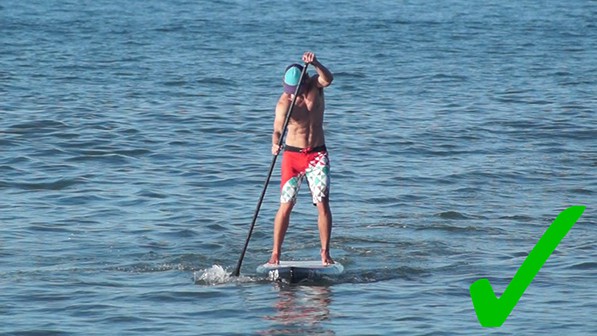
  • Keep your arms straight with just a slight bend in the elbow.

  • Maintain a straight back and bend at the knees to avoid injury. Do not hunch over.

  • Think of the power come from your core rather than upper body.

  • Extend the blade forward as far as comfortable and fully submerge the blade.

  • Only after it is full submerged pull the paddle back towards your feet.

good copy ehgjkejskgjth copy

  • The more straight up and the paddle is the more straight it will propel you.

  • Shorter strokes are best to start with when you are a beginner.

  • Do 4-6 strokes and then switch sides with your paddle. Reverse hand positions when doing this.


Catch Phase of the SUP Forward Stroke

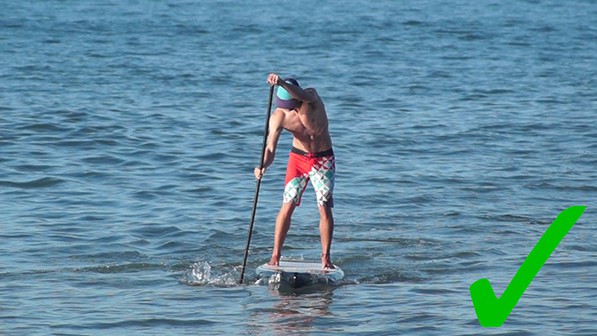
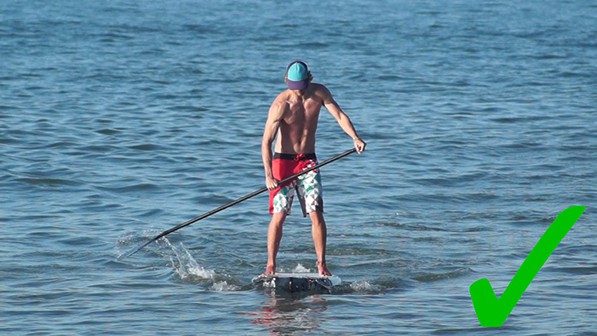
  • Place the paddle in the water toward the tip of the SUP. The face of the blade should be facing toward the rear of the board at the catch phase of the SUP forward stroke. Place the blade all the way in the water up to the throat before transitioning to the power phase of the SUP forward stroke.

ifgkgkdtjghrth copy good copy

Power Phase of the SUP Forward Stroke

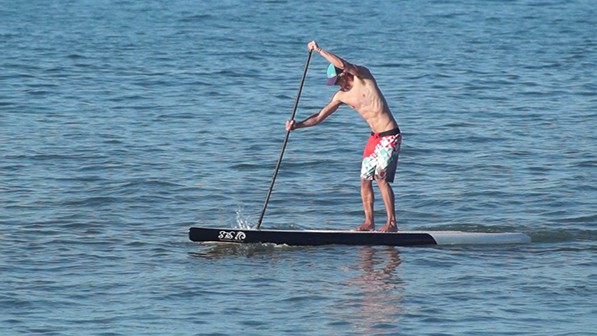
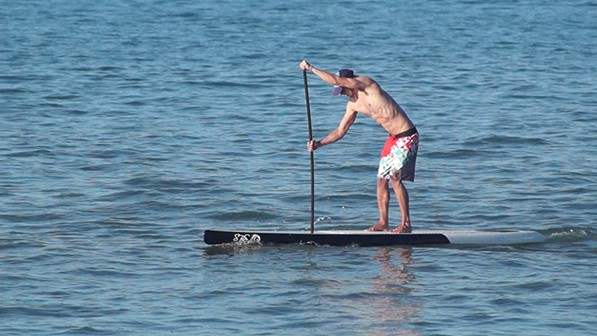
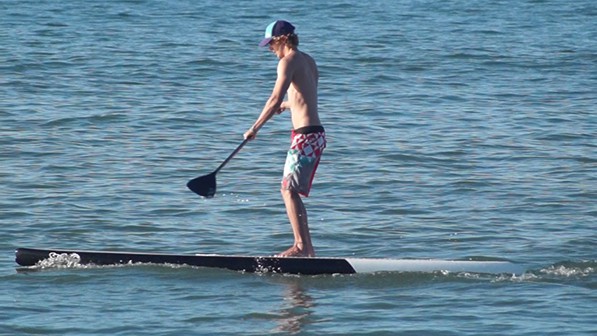
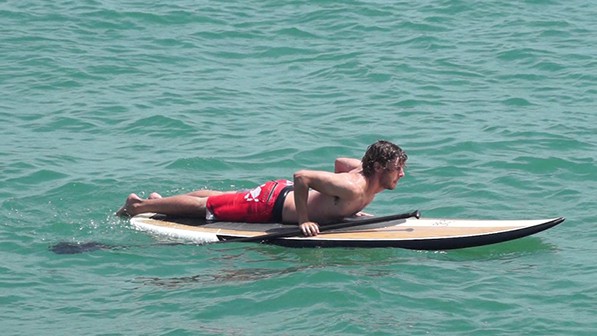
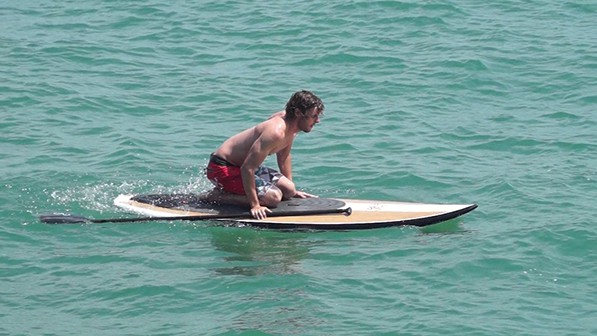
  • Once the blade is in the water the power phase begins. This is the part that people usually do wrong. They pull the paddle blade through the water with their arms which is a great way to get worn out. The proper way to bring the paddle through the water is by rotating the torso. Try keeping the top hand level and moving across the horizon throughout the power phase. This will force you to rotate to bring the paddle along the board rather than pulling your arms. Keep the paddle as close to the board as you can. This will minimize the rotation of the board throughout the stroke.

gtkkslgjkjrtg copy good1 copy

Recovery Phase of the SUP Forward Stroke

  • The overall length of the stroke will depend on the length of the board. On shorter boards the stroke should go from tip to hip. On longer boards the stroke can be extended back further. Begin the recovery phase before the board starts turning. Begin to remove the paddle at the end of the power phase. Then rotate the torso back to the front thereby setting the paddle up for the next stroke on the same side.

hrjijrijhikjyy copy good3 copy

Common Beginner’s Mistakes in Paddleboarding

  • A hunched posture. Keep your back straight, shoulders level.

  • Staring at your feet instead of the horizon.

  • The elbow (bent angle) of the paddle facing in the wrong direction. It should point away from you.

  • Having both hands on the paddle shaft. Your top hand belongs at the top of the paddle, on the grip.

  • Standing straight-kneed. It’s much easier to balance with bent knees.

Related Posts

SUP MAG Review – The Longbow

SUP MAG Review – The Longbow

The Don is our big board for big distances, its our high performance SUP for touring, fitness, and racing. Its all-around streamline design is perfect for flat-water performance, recreational users as well as open ocean long distance competitors looking for a board...

10 Essentials For Cold Water Surfing

10 Essentials For Cold Water Surfing

When winter rolls around you know that the waves come in “usually”. This means cold waters heading your way. Surfing in the winter can be great or awful depending on how prepared you are. Don't let the cold stop you from having an awesome surf. Whether you're a...

Best 2019 NEW Surfboards

Best 2019 NEW Surfboards

In 2019 SBS Boards are bringing you the very best in our NEW surfboard range with some brand new construction using our full flex and rapid flex technology aswell as some brand new shapes and designs just for 2019 we have revamped and improved our classic favourites...

HOW TO NOT BE A KOOK

HOW TO NOT BE A KOOK

 HOW TO KNOW IF YOUR A KOOK Other Sports you may be called a poser. Someone pretending to be better than he/she is and is very clear to see after a short period of time they're definitely not as good as they think SO WHAT IS A KOOK?  Surfers seem to have their own...

What A Vegan Surfer Eats In 1 Day

What A Vegan Surfer Eats In 1 Day

With the growing movement of veganism in the UK and the rest of the world, we wanted to explore what it means to be a vegan surfer in the UK. as our video above shows one of our team rider JACK and what he eats in a day as a vegan surfer in the UK Veganism has quite...

Should All Surfers Be VEGAN?

Should All Surfers Be VEGAN?

With so much hype about the environment and Veganism in the news and media, we wanted to ask the question: Should all surfers be Vegan?  Veganism has grown massively around the world in the last few years, in increase in popularity has been especially noticeable here...

How To Wax A Surfboard

How To Wax A Surfboard

HOW TO WAX A SURFBOARD 


Wax has been used for years to help surfers gain traction and grip to their surfboards in water. Traditionally a surfboard is quit slippery in the water and without wax or traction pads I would be difficult to paddle and ride. Most surfboards have a thin layer of wax on the deck. Surf wax applied correctly will create a layer of small waxy bumps giving your feet a grip/traction

The following is a beginner’s guide to waxing your board as well as a tutorial of how to get the perfect traction for your board If you’ve never waxed a surfboard before or you’re just looking for tips to get a better wax job, here is our guide to waxing your surfboard.

Wax types

Choosing the right wax for the job is key depending on the size of the board as well as the temperature of the water will determine what wax you need tropical water, warm water, cool water & cold water are your usual wax names if  you take a cold water wax to warm water, it will be too soft.  But you could use a warm water wax in cold water, but it’s better to get what you need.In the UK the average temperature varies from around 4 C in winter to around 15 C in summer. There for you will need to possible change your wax in the summer and winter. But most of the year Cold water wax is perfect

Wax temperature guide below

How To Wax A Surfboard In 5 Steps

Step 1: What You Will Need 

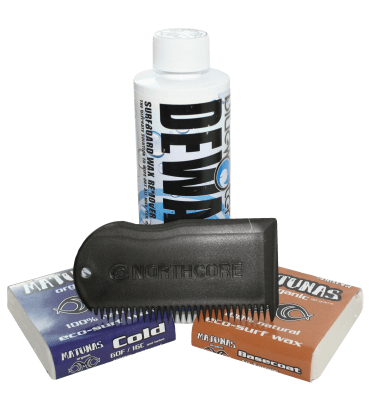
To wax your surfboard The main thing you will need is some wax remover/white spirit/a rag or cloth/ basecoat wax, topcoat wax and a wax combe

Step 2: Clean The Surfboard 

When starting to wax a surfboard you need to remove any debris, dirt or previous wax to ensure the surfboard is clean to ensure you get proper adherence. If your surfboard is brand new follow step 4

First take the wax combe and start scrape off all of the wax with the straight side of your wax comb. It helps if the wax can be heated up or the board left in the sun to aid this process. Ensure that you remove all wax from rails nose tail & deck using the curved and flat sides of the combe


You will still have a small amount of wax on the board so you will need to use wax remover cleaning product or white spirit that will dissolve any excess wax. Gently rub a cloth over the area to ensure all the wax is gone & wash off the cleaning solution with water.

Step 3 Where To Put Wax On Your Surfboard

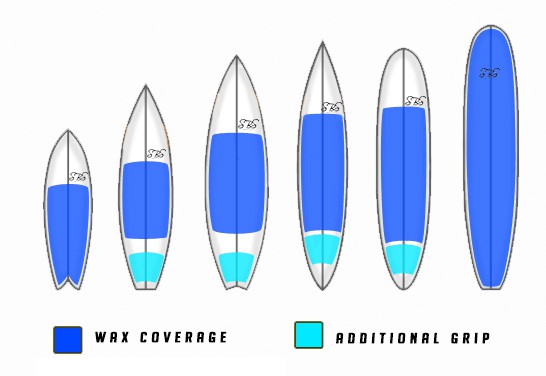
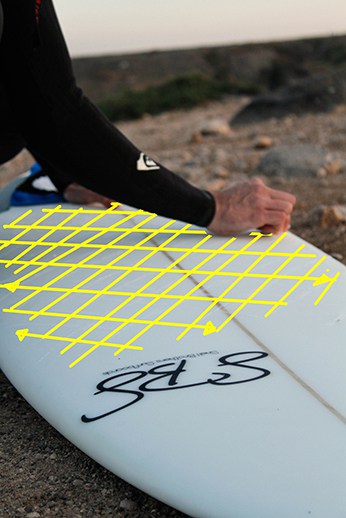
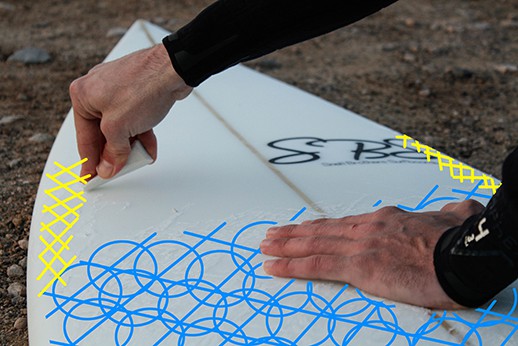
The picture below shows a rough guide of were to apply your wax on different types of the surfboard. Other areas include around the rails were you grip the board for duck diving and also all the way to the nose. Also, try to keep any wax off the bottom of your board as that will slow it down making your board less responsive.

Step 4: Applying The Basecoat

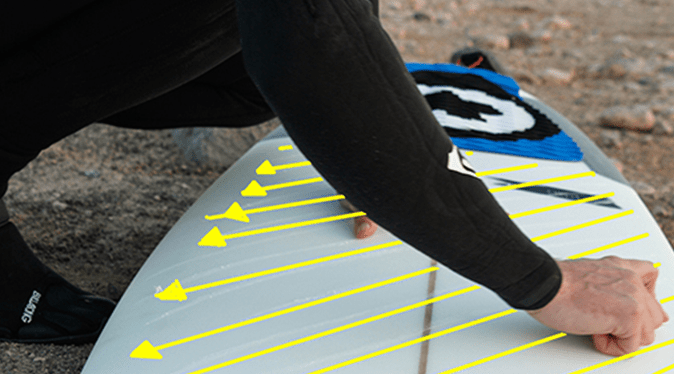
The basecoat is the foundation of your grip basecoat wax is harder than top coat and will last longer on your board. It also makes it harder to apply so will require a strong amount of pressure. It will help to create a pattern of bumps on your surfboard that helps the top cote stick easier. The base coat will help to keep your wax on for longer were as applying just topcoat would need to be applied constantly.

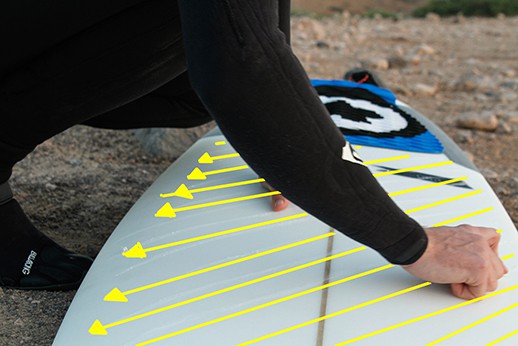
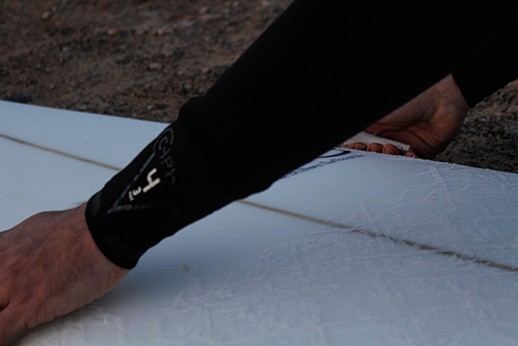
Begin by applying broad strokes on the board and continuing until you see a bump pattern emerge. Each surfer is different so try a range of patterns and styles of waxing that works for you


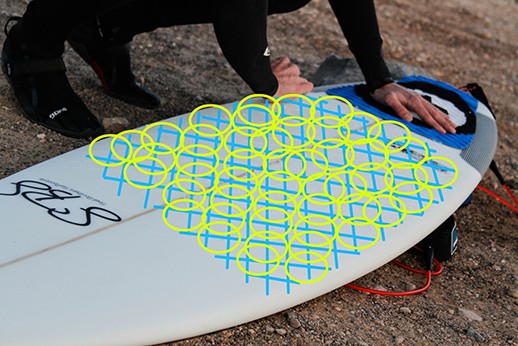
Its a good idea is to start off with criss crosses by going diagonal one way up the board and then go perpendicular to that direction back down the board. Its then a good idea to fill on those criss crosses by either

Front to Back: Rub the wax in a straight line parallel to the rocker and to keep grip when duck diving apply a small amount on the rails close to the nose

Circles: Rub the wax in little circles, moving up and down the board

Front to Back: Rub the wax in a straight line parallel to the rocker and to keep grip when duck diving apply a small amount on the rails close to the nose

Random: doing circular, straight, side to side in a random directions. After doing this for a few minutes “if properly performed “you will see small bumps and lumps begin to appear. Ensure to keep waxing until you have an even and suitable layer of wax.

Step 5: Top Coat 

Now it’s time to apply the top coat of wax. Usually a lot softer in texture and greatly affected by heat changes and water temperature

The top coat is applied in the same way as the basecoat but with less pressure as the wax is softer. Use a similar technique.


Keep your wax sticky for longer 

Once you finished your surf you will want to prepare your wax for the next session. Wax will enviable flake off and get stuck to your wetsuit body and shorts, therefor to keep your board at maximum grip you will need to reapply small amount of top coat before each session. The wax will eventually get flatter and less sticky a great tip if you haven’t got any wax or want a little more grip use the jagged side of a wax combe to scratch some lines in the wax to reveal the fresher wax underneath this will help your wax go further


If you surf a lot and find your wax isn’t doing its job it’s a good idea to go back to the beginning and start a fresh basecoat. On average a new basecoat should be applied every year but if you surf a lot every 3-4 months might be ideal.

Related Posts

SUP MAG Review – The Longbow

SUP MAG Review – The Longbow

The Don is our big board for big distances, its our high performance SUP for touring, fitness, and racing. Its all-around streamline design is perfect for flat-water performance, recreational users as well as open ocean long distance competitors looking for a board...

10 Essentials For Cold Water Surfing

10 Essentials For Cold Water Surfing

When winter rolls around you know that the waves come in “usually”. This means cold waters heading your way. Surfing in the winter can be great or awful depending on how prepared you are. Don't let the cold stop you from having an awesome surf. Whether you're a...

Best 2019 NEW Surfboards

Best 2019 NEW Surfboards

In 2019 SBS Boards are bringing you the very best in our NEW surfboard range with some brand new construction using our full flex and rapid flex technology aswell as some brand new shapes and designs just for 2019 we have revamped and improved our classic favourites...

HOW TO NOT BE A KOOK

HOW TO NOT BE A KOOK

 HOW TO KNOW IF YOUR A KOOK Other Sports you may be called a poser. Someone pretending to be better than he/she is and is very clear to see after a short period of time they're definitely not as good as they think SO WHAT IS A KOOK?  Surfers seem to have their own...

What A Vegan Surfer Eats In 1 Day

What A Vegan Surfer Eats In 1 Day

With the growing movement of veganism in the UK and the rest of the world, we wanted to explore what it means to be a vegan surfer in the UK. as our video above shows one of our team rider JACK and what he eats in a day as a vegan surfer in the UK Veganism has quite...

Should All Surfers Be VEGAN?

Should All Surfers Be VEGAN?

With so much hype about the environment and Veganism in the news and media, we wanted to ask the question: Should all surfers be Vegan?  Veganism has grown massively around the world in the last few years, in increase in popularity has been especially noticeable here...

Beginners Guide to Surf Safety & Surf Etiquette

Beginners Guide to Surf Safety & Surf Etiquette

begginer danger

Beginners guide to Surf Safety & Surf Etiquette


Learning to Surf is one of the most fun and life changing experiences you can have, and for lots of people journey that can last a life time. But before you start it’s really important to have a basic understanding of all the safety elements associated with surfing before getting in the water .Below we have out lined some simple tips to help keep you safe in the water and make your surfing experience as pleasurable and as safe as possible.
Things to know before you go

Have a Lesson: If you are starting surfing have a lesson by a qualified School/instructor. Here you will be introduced to the sport in a safe environment.

Be a Good Swimmer: Do not attempt surfing unless you can swim.

Always let somebody on land know where you have gone and when you will return.

Check the weather and tides before you paddle out. Learn to observe the ocean so you can identify rips, wind changes and other hazards.

Check Equipment: Make sure your equipment; especially your leash is in good order. Remember it is much easier to spot a brightly coloured surfboard or wetsuit at sea in the event of you requiring rescuing. Consider other safety equipment.

Protect your Head: When you “wipe-out” always protect your head with your arms.

Help Others: Should you see a surfer in difficulty in the water DON’T DELAY phone 112 (EU) or 999 (UK) and ask for the Coast Guard. Even the most experienced surfer may at some time require assistance.

Know First Aid: Every surfer should obtain first aid and water safety training you might just save a life of a friend or fellow surfer.

Always be aware of other surfers:      around you, never let go of your surfboard if caught inside unless you are      100% sure that there is no one behind you.

Stay With Your Board: If you  find yourself in difficulty it is important to stay calm and always stay      with your board.

Fit to surf

“Making sure you are fit enough for surfing is a key part of staying safe”

Knowing how to swim is the best defence against drowning. Swimming instruction at an early age is a crucial step to protecting the surfer from injury or death.

You need Reasonable fitness and be able to swim. For your swimming ability you will need to be able to swim comfortably for at least 500m.   (Remember the bigger the surf the harder it’s going to get and the stronger your swimming will need to be.

Your fitness will also influence how long you stay in the water for (the fitter you are the longer you can surf)

Protect your self

Don’t dive head first: (protect   your head and neck) When falling off a surfboard or “wiping out” try to fall   flat always extending a hand ahead of you. Try to land feet first if possible   and always protect your head with your arms.

Sun protection: SPFs of at least 15, which block 93 % of UVB rays. While  Higher SPFs may be advisable for   sun-sensitive individuals, skin cancer patients,

Rash guards:  helps protects against sun damage. They also help protect against rash caused by an   allergic reaction to

Wetsuit: Using a wetsuit especially   the correct wetsuit when water temps are cold lower your Risk of hypothermia

Use the  wetsuit guide to help keep you self safe and warm in the water.

Wetsuit-Chart-v2

Use A leash: Surfboards should   always be used with a leash. If the wave is keeping you under and you are   unable to discern Which way is to the surface you can follow the   leash back to the surface. The surfboard will  always stay on the Surface even when broken. If you are surfing   closer to shore. The leash minimizes the distance the surfboard Gets away from you. It also saves a swim to your   board  after a wipe out as well as a   great flotation device in an Emergency situation but should never be relied on   as a life saving device.

Cramps: Avoid cramps by   not eating at least one hour before surfing and of course don’t go surfing When drunk!

Water Safety

Rip Currents 

Rip current also knows as Rips are strong water currents usually found moving out to sea.  

Rips are formed by when waves break, water is pushed up the slope of the shore this water back toward the sea. It converges in a narrow, river-like current moving away from shore, the water will retreat finding the route with the least resistance, through  the form of deeper or steep channels back seawards either directly or parallel to the beach. Rip currents may pull continuously, but they can suddenly appear or intensify after a set of waves,. Side currents, inshore holes, and other bottom conditions contribute to the formation of rip currents.

A rip can be recognised because as it flows back it will disturb the approaching waves and make them uneven and/or flatten the water’s surface.

rip-poster_image

What to do if you get caught in a rip current 

Ripdiagram_NEW2_350b

The best way to avoid Rip Currents is by spotting areas that create Rips regularly and avoiding them, but if you do get caught in a rip.

Relax, stay calm and don’t just swim for shore.

Do Not Panic and swimming against the current

Swim parallel to the beach.  Often it only takes a few seconds before you feel yourself free of the pull.

Then Swim to shore using the waves as extra push by body surfing in.

–  If you cannot break free just tread water.  Remember the rip will take you to the end of the break zone and no further.

Swim parallel to the beach then in  to shore

People on the beach signal for help by waving 1 of your arms and calling for help.  Once people see you just stay calm and tread water.  Float on your back if you Get tired

Unless you are an experienced surfer, rips need to be avoided as they can take you out to sea, so before entering the water check with locals or a lifeguard and ask where is safe to surf.

Tides:

If you are surfing in an area with a tidal range, try to get hold of a tide timetable.   Not only are most breaks affected by the state of the tide but some areas can become highly dangerous and can cut off the unwary from land. If in doubt ask.

Equipment:

Make sure you have the right equipment, and your equipment is in full working order a faulty leash, board wetsuit will soon cause problems in the water, Check your equipment before you go.

Beach flags:

watersafety

Warning flags are displayed   at many beaches to assist you. You will need to avoid the beach   sectioned off with red/yellow flags which is designated for swimmers and if   the red flag is flying don’t enter the water at all as the condition s are   considered dangerous.

Surf Safety & Surf Etiquette


What is Surfing Etiquette?

Surfing etiquette is a set of “rules” or a “code of conduct” that is based on common sense and consideration of others. All surfers should follow these general rules and guidelines to ensure that everyone can have a safe and enjoyable session in the water.

Learning, understanding, and following these basic surfing etiquette guidelines are a must for any surfer. If all water users show respect, the line-up will be a safer and friendlier place for all to enjoy! Remember, the best surfer at any beach is the one having the most FUN!!

SurfersCode1

Respect the environment: Surfers are often considered ocean ambassadors and should promote the health of our beaches and ocean. We depend on a clean and healthy ocean, so always properly dispose of any trash you encounter on the beach. Maintain a positive attitude! Surfing should be fun for you and everyone else in the line-up. Respect others and share waves.

Respect Others: Be aware of other water users and always show respect regardless of craft, keep a good attitude, be friendly and apologize if you make a mistake.

Paddle out Safely: When paddling out, be aware that a surfer actively riding a wave has the right of way. As a paddler, it is your obligation to avoid a surfer on a wave. Paddle wide of the breaking waves to help avoid collisions or obstructions.

Control your board: ONLY abandon your surf board if no one is around  “Dive to stay alive”

Never “drop in”: on another surfer. “Dropping in” is taking off on a wave in front of another surfer who has right of way. (See illustration).

Do not snake: A snake is someone who aggressively positions him/herself in front of another surfer who otherwise would be in position to catch the wave. Remember to always respect other more experienced surfers and share waves.

Communicate: If you are surfing a peak where you have an option to go right or left you must communicate with other surfers in the line up your preferred direction to avoid ‘drop ins’ and unridden waves. At some breaks you may be able to paddle out into a position that gives

Follow the local laws: at the beach you visit. Different beaches maintain different sets of laws (i.e. surf zones, surfing near jetties and piers etc.), so check with a lifeguard for relevant laws before you enter the water.

All ways wear a leash: Not only is it a law at many beaches, but wearing a leash is an important way to keep your board close to you and to keep it from becoming a hazard to other surfers.

Help fellow surfers or swimmer if trouble in the water: The ocean is a dynamic environment and there are many safety hazards including rip currents. Should another surfer or swimmer encounter a problem, immediately offer assistance?

Know CPR/First Aid: Everyone who surfs should be certified in CPR and Basic First Aid.

Don’t let this advice spoil any of your fun though!  Surfing is fantastic and with a little common sense and safety awareness you’ll be able to have a great time in the surf.

Disclaimer: The information found within this site is for general information only and should not be treated as a substitute for local advice from local authorities, lifeguards, instructors and schools.  SBSboards.com is not responsible or liable for any Action made by a user based on the information shown within this website. Always consult your own local lifeguard’s if in any way concerned about your safety or health.

[]