Beginners Guide to Surf Safety & Surf Etiquette

Beginners Guide to Surf Safety & Surf Etiquette

begginer danger

Beginners guide to Surf Safety & Surf Etiquette


Learning to Surf is one of the most fun and life changing experiences you can have, and for lots of people journey that can last a life time. But before you start it’s really important to have a basic understanding of all the safety elements associated with surfing before getting in the water .Below we have out lined some simple tips to help keep you safe in the water and make your surfing experience as pleasurable and as safe as possible.

Things to know before you go

Have a Lesson: If you are starting surfing have a lesson by a qualified School/instructor. Here you will be introduced to the sport in a safe environment.

Be a Good Swimmer: Do not attempt surfing unless you can swim.

Always let somebody on land know where you have gone and when you will return.

Check the weather and tides before you paddle out. Learn to observe the ocean so you can identify rips, wind changes and other hazards.

Check Equipment: Make sure your equipment; especially your leash is in good order. Remember it is much easier to spot a brightly coloured surfboard or wetsuit at sea in the event of you requiring rescuing. Consider other safety equipment.

Protect your Head: When you “wipe-out” always protect your head with your arms.

Help Others: Should you see a surfer in difficulty in the water DON’T DELAY phone 112 (EU) or 999 (UK) and ask for the Coast Guard. Even the most experienced surfer may at some time require assistance.

Know First Aid: Every surfer should obtain first aid and water safety training you might just save a life of a friend or fellow surfer.
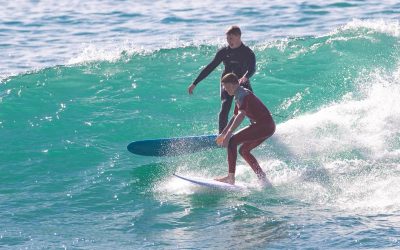
Always be aware of other surfers:      around you, never let go of your surfboard if caught inside unless you are      100% sure that there is no one behind you.

Stay With Your Board: If you  find yourself in difficulty it is important to stay calm and always stay      with your board.
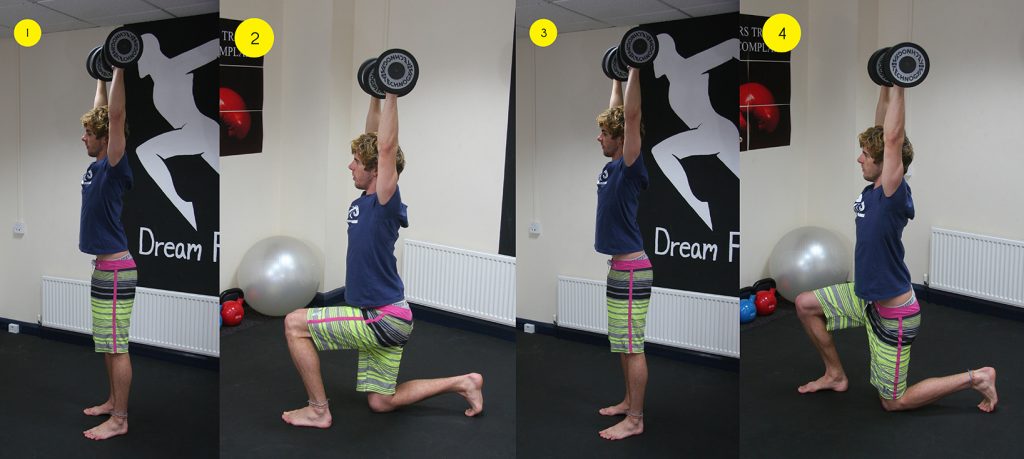
Fit to surf

“Making sure you are fit enough for surfing is a key part of staying safe”

Knowing how to swim is the best defence against drowning. Swimming instruction at an early age is a crucial step to protecting the surfer from injury or death.

You need Reasonable fitness and be able to swim. For your swimming ability you will need to be able to swim comfortably for at least 500m.   (Remember the bigger the surf the harder it’s going to get and the stronger your swimming will need to be.

Your fitness will also influence how long you stay in the water for (the fitter you are the longer you can surf)

Protect your self

Don’t dive head first: (protect   your head and neck) When falling off a surfboard or “wiping out” try to fall   flat always extending a hand ahead of you. Try to land feet first if possible   and always protect your head with your arms.

Sun protection: SPFs of at least 15, which block 93 % of UVB rays. While  Higher SPFs may be advisable for   sun-sensitive individuals, skin cancer patients,

Rash guards:  helps protects against sun damage. They also help protect against rash caused by an   allergic reaction to
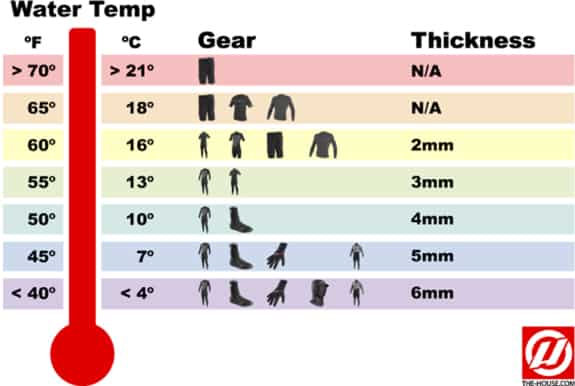
Wetsuit: Using a wetsuit especially   the correct wetsuit when water temps are cold lower your Risk of hypothermia

Use the  wetsuit guide to help keep you self safe and warm in the water.

Wetsuit-Chart-v2

Use A leash: Surfboards should   always be used with a leash. If the wave is keeping you under and you are   unable to discern Which way is to the surface you can follow the   leash back to the surface. The surfboard will  always stay on the Surface even when broken. If you are surfing   closer to shore. The leash minimizes the distance the surfboard Gets away from you. It also saves a swim to your   board  after a wipe out as well as a   great flotation device in an Emergency situation but should never be relied on   as a life saving device.

Cramps: Avoid cramps by   not eating at least one hour before surfing and of course don’t go surfing When drunk!

Water Safety

Rip Currents 

Rip current also knows as Rips are strong water currents usually found moving out to sea.  

Rips are formed by when waves break, water is pushed up the slope of the shore this water back toward the sea. It converges in a narrow, river-like current moving away from shore, the water will retreat finding the route with the least resistance, through  the form of deeper or steep channels back seawards either directly or parallel to the beach. Rip currents may pull continuously, but they can suddenly appear or intensify after a set of waves,. Side currents, inshore holes, and other bottom conditions contribute to the formation of rip currents.

A rip can be recognised because as it flows back it will disturb the approaching waves and make them uneven and/or flatten the water’s surface.

rip-poster_image

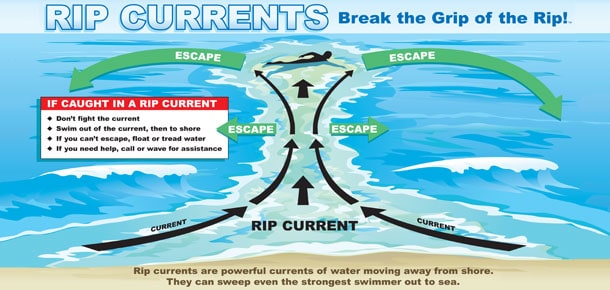
What to do if you get caught in a rip current 

Ripdiagram_NEW2_350b

The best way to avoid Rip Currents is by spotting areas that create Rips regularly and avoiding them, but if you do get caught in a rip.

Relax, stay calm and don’t just swim for shore.

Do Not Panic and swimming against the current
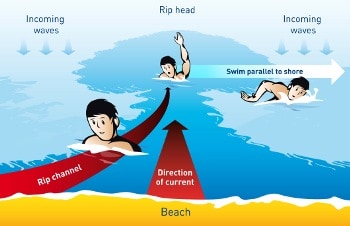
Swim parallel to the beach.  Often it only takes a few seconds before you feel yourself free of the pull.

Then Swim to shore using the waves as extra push by body surfing in.

–  If you cannot break free just tread water.  Remember the rip will take you to the end of the break zone and no further.

Swim parallel to the beach then in  to shore

People on the beach signal for help by waving 1 of your arms and calling for help.  Once people see you just stay calm and tread water.  Float on your back if you Get tired

Unless you are an experienced surfer, rips need to be avoided as they can take you out to sea, so before entering the water check with locals or a lifeguard and ask where is safe to surf.

Tides:

If you are surfing in an area with a tidal range, try to get hold of a tide timetable.   Not only are most breaks affected by the state of the tide but some areas can become highly dangerous and can cut off the unwary from land. If in doubt ask.

Equipment:

Make sure you have the right equipment, and your equipment is in full working order a faulty leash, board wetsuit will soon cause problems in the water, Check your equipment before you go.

Beach flags:

watersafety

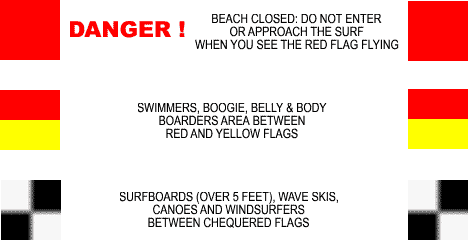
Warning flags are displayed   at many beaches to assist you. You will need to avoid the beach   sectioned off with red/yellow flags which is designated for swimmers and if   the red flag is flying don’t enter the water at all as the condition s are   considered dangerous.

Surf Safety & Surf Etiquette


What is Surfing Etiquette?

Surfing etiquette is a set of “rules” or a “code of conduct” that is based on common sense and consideration of others. All surfers should follow these general rules and guidelines to ensure that everyone can have a safe and enjoyable session in the water.

Learning, understanding, and following these basic surfing etiquette guidelines are a must for any surfer. If all water users show respect, the line-up will be a safer and friendlier place for all to enjoy! Remember, the best surfer at any beach is the one having the most FUN!!

SurfersCode1

Respect the environment: Surfers are often considered ocean ambassadors and should promote the health of our beaches and ocean. We depend on a clean and healthy ocean, so always properly dispose of any trash you encounter on the beach. Maintain a positive attitude! Surfing should be fun for you and everyone else in the line-up. Respect others and share waves.

Respect Others: Be aware of other water users and always show respect regardless of craft, keep a good attitude, be friendly and apologize if you make a mistake.
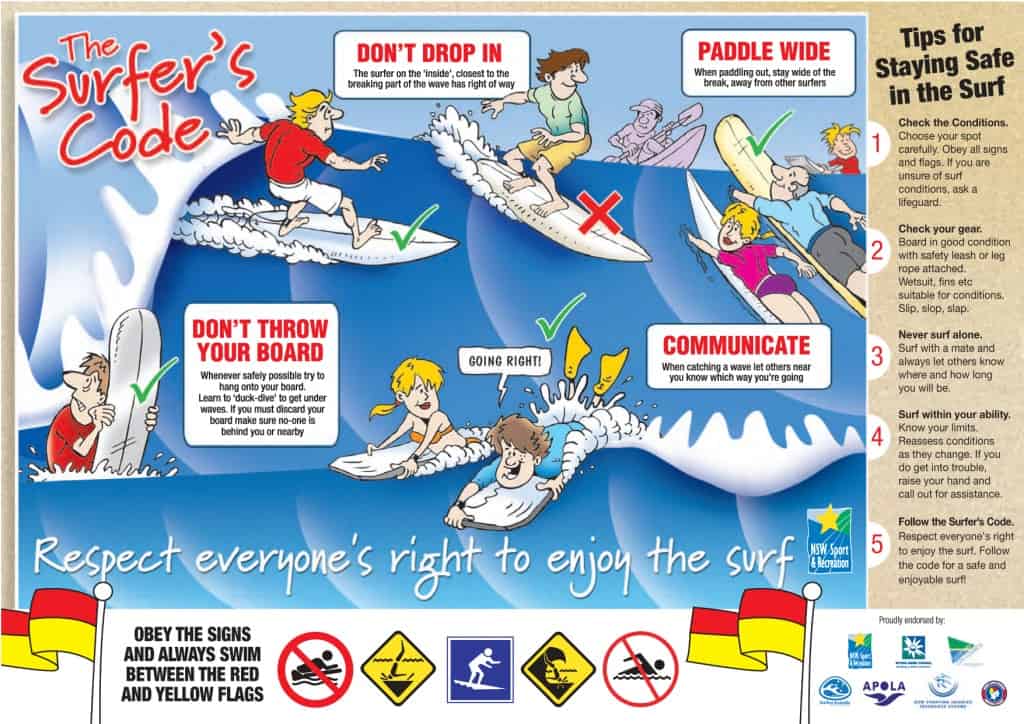
Paddle out Safely: When paddling out, be aware that a surfer actively riding a wave has the right of way. As a paddler, it is your obligation to avoid a surfer on a wave. Paddle wide of the breaking waves to help avoid collisions or obstructions.
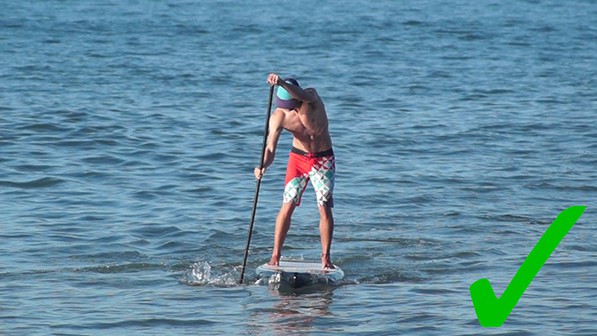
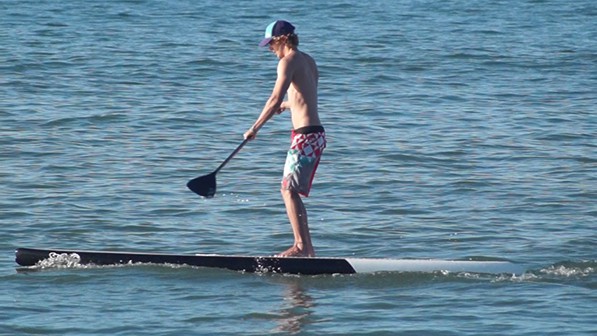
Control your board: ONLY abandon your surf board if no one is around  “Dive to stay alive”

Never “drop in”: on another surfer. “Dropping in” is taking off on a wave in front of another surfer who has right of way. (See illustration).

Do not snake: A snake is someone who aggressively positions him/herself in front of another surfer who otherwise would be in position to catch the wave. Remember to always respect other more experienced surfers and share waves.

Communicate: If you are surfing a peak where you have an option to go right or left you must communicate with other surfers in the line up your preferred direction to avoid ‘drop ins’ and unridden waves. At some breaks you may be able to paddle out into a position that gives

Follow the local laws: at the beach you visit. Different beaches maintain different sets of laws (i.e. surf zones, surfing near jetties and piers etc.), so check with a lifeguard for relevant laws before you enter the water.

All ways wear a leash: Not only is it a law at many beaches, but wearing a leash is an important way to keep your board close to you and to keep it from becoming a hazard to other surfers.

Help fellow surfers or swimmer if trouble in the water: The ocean is a dynamic environment and there are many safety hazards including rip currents. Should another surfer or swimmer encounter a problem, immediately offer assistance?

Know CPR/First Aid: Everyone who surfs should be certified in CPR and Basic First Aid.

Don’t let this advice spoil any of your fun though!  Surfing is fantastic and with a little common sense and safety awareness you’ll be able to have a great time in the surf.

Disclaimer: The information found within this site is for general information only and should not be treated as a substitute for local advice from local authorities, lifeguards, instructors and schools.  SBSboards.com is not responsible or liable for any Action made by a user based on the information shown within this website. Always consult your own local lifeguard’s if in any way concerned about your safety or health.

Beginner’s Guide to Stand Up Paddle boarding (SUP)

Beginner’s Guide to Stand Up Paddle boarding (SUP)

Beginner’s Guide to – Stand Up Paddle Board

Gettting Started

Stand up paddle boarding (SUP) is one of the fastest growing sports in the UK. Its popularity is due to fun and relaxing nature of the activity, accessible to all. Its also a great way to give your body a full workout and thus has become a popular cross-training activity for athletes, and recreation users as a great way to stay in shape. It can be done pretty much on any water surface, whether it be open ocean, in the surf or lakes and rivers. stand up paddle boarding also allows you to travel in style whiles providing you with a unique view of the ocean without any limitations. 

Paddleboarding Gear

To Get started in Sup you only need a small amount of equipment to start to enjoy this sport.

don package emil

  • Stand up paddleboard:

  • This will usually be your biggest and most significant gear investment. Sizes are based on the paddler’s weight and experience. You will also need to take in to consideration where you will be using the board and how?. Are you going to be using it in waves, flat water, recreational, race, touring etc? Check out our recommendations before you buy.
  • Paddle:

  • Stand up paddles have an angle or “elbow” in the shaft for maximum efficiency. Choose a paddle that’s roughly 8” to 12” taller than you are the recommend heights can change depending on your intended usage i.e. racing, surf, flat water, touring).Personal Flotation Device (PFD)
  • Options to consider

  • A must have life saving device for beginners as well as experienced if you plan on going out of your depth or the open ocean While not required everywhere, it is always recommended to have a PFD when paddling. This can be either a regular life vest or a belt pack. In certain areas they are required so always make sure you check the local laws regarding PFD before you head out and you can be ticketed without one.

Appropriate clothing

  • Depending on the weather and temperature you will need to dress appropriately. In warm weather you can generally were a swimsuit and rash guard for some sun protection. If you are going to paddle in colder conditions where hypothermia is a concern, you will need a wetsuits, booties, gloves, possible a hood and other cold water protection.

Sun Protection

  • Out on the water you always want to have good sunscreen and sunglasses to protect you from UV rays.Wear a hat, or long sleeves t-shirt if out long distances or just recreational you should always protect yourself from the sun no matter how long your out. Carrying Your Board to the Water
  • There are three ways to carry your board, either using the integrated carry handle holding the rails or on your head. For short distances without much cross wind the handle is easiest.
  • Techniques: Getting Started
  • Carry Handle: Lean the board on its rail or side. Stand on the bottom side of the board. Reach over and grab the handle. Use your free hand to carry your paddle.

handle copy

  • Side Carry:

  • This way or carrying a sup is only advised for short journeys

hfjgkgk copy

  • Head Carry:

  • Stand the board on its tail with the top facing you and your paddle on the ground close to you. Grab the rails of the board. Walk yourself under the board so your head is in the center point of the board and balanced. You can now bend down and pick up the paddle to head to the water.

jkdjfkjskjfkjskg

The Leash / Leg Rope

A leash is important safety device in case you fall off of your board. It will keep the board from floating too far away from you and potentially into someone else. Especially helpful if you are in waves or there is a current. You attach one end of the leash to the tail of the board and the other around your ankle. Here 4 simple steps to properly attach your leash:

  • Slide the leash rope through the area at the tail of the board.
  • Velcro the rope to the leash so it is secure in the layers.
  • Attach the other end of the leash to your ankle or calf.
  • Be sure both ends are secure by giving a little tug on each end.

Putting on your fin

All paddle boards require fins. Most boards come with a single or tri fin setup. Here are some simple steps to get the fins setup:

Center fin

  • Put the board down bottom up.
  • Drop the washer into the fin box.
  • Line up the washer toward the front half of the fin box or where you want the front of your fin to sit.
  • Insert the fin. Slide the fin closer to the nose to help the ride track straighter or further back to turn easier. Most people put it center of the fin box.
  • When fin is in place line the washer up with where the screw goes in and twist it until it is snug.

Side Fins

On some sups there will be small side fins mostly used if in waves to give greater control

  • These are the two smaller fins that go on the outer rails:
  • There is a flat surface (foil) on each and you want this facing in.
  • Put each fin in and tighten them with a fin key or allen wrench.

Mounting the Paddleboard

When you’re new to the sport, it’s best to start out in flat, calm water if possible with in your depth, whilst being free of obstacles like boats and buoys or swimmers.

At first, you may find it easier to kneel on the board rather than to stand upright. Here are the steps to get you started:

  • Stand alongside the board in shallow water, place your paddle across the deck of the board and use it as an outrigger. The paddle grip is on the rail (edge) of the board; the blade rests on the water.
  • Hold the board by the rails. One hand will also be holding the paddle grip.

dkjfkjskgjkshg copy

  • jump onto the board into a kneeling position, just behind the center point of the board.

hgkjkjkjh copy

  • From that kneeling position, get a feel for the balance point of the board. The nose shouldn’t pop up out of the water and the tail shouldn’t dig in.practicing on the beach before you enter the water is a good idea as you will be able to become comfortable with the motion of getting up

Standing up and stance

  • If in shallow water place the board face up so the fin is not dragging in the sand and rocks.
  • Walk the board out to around knee high water with the paddle lying across the deck of your board.
  • Grip the rails (sides) of the board and pop onto the board in a kneeling position slightly behind the center of the board.
  • In the position you can get a feel for balancing on the board. You can feel the side to side and front to back balance point.
  • From the kneeling position you can actually start paddling if you prefer to get comfortable with a lower center of gravity first.
  • Once you feel comfortable place your hands on the sides of the board and stand up at that balance point you felt.
  • You are now standing on your board and ready to start your stroke!

 Once you’re ready, stand up on the board one foot at a time. Place your feet where your knees were.

hdahjahef copy

ghhghghghghghj copy

  • Your toes should be facing forward with your feet parallel and about hip to should width apart depending on the width of your board.
  • Be sure to not stand on the rails of your board.
  • A relaxed slight bend in your knees will help you stay balanced out there.

1111111s copy

  • Stand with your head and shoulders upright with your eyes looking ahead and not down at your feet.
  • Balance with your hips—not your upper body.
  • Forward movement of the board through the water will help increase your stability.
  • Make minor adjustments if needed forward or backwards depending on how the board is riding.
  • when your forward momentum increases, your stability increases as well.

Fall and recovery

  • Always be aware of any objects around such as other paddlers, buoys, or other watercraft.
  • When you feel yourself loosing your balance and about to fall, give the board a little push away as you fall. Falling in the water is a lot better than falling into your board.
  • If the board is taken away in a current or wave always try to retrive the board before retrieving your paddle.

1212 copy

321123 copy

2313212 copy

31231vthgfh copy

Basic Paddleboarding strokes

  • Keep your arms straight with just a slight bend in the elbow.
  • Maintain a straight back and bend at the knees to avoid injury. Do not hunch over.
  • Think of the power come from your core rather than upper body.
  • Extend the blade forward as far as comfortable and fully submerge the blade.
  • Only after it is full submerged pull the paddle back towards your feet.

good copy

ehgjkejskgjth copy

  • The more straight up and the paddle is the more straight it will propel you.
  • Shorter strokes are best to start with when you are a beginner.
  • Do 4-6 strokes and then switch sides with your paddle. Reverse hand positions when doing this.


Catch Phase of the SUP Forward Stroke

  • Place the paddle in the water toward the tip of the SUP. The face of the blade should be facing toward the rear of the board at the catch phase of the SUP forward stroke. Place the blade all the way in the water up to the throat before transitioning to the power phase of the SUP forward stroke.

ifgkgkdtjghrth copy

good copy

Power Phase of the SUP Forward Stroke

  • Once the blade is in the water the power phase begins. This is the part that people usually do wrong. They pull the paddle blade through the water with their arms which is a great way to get worn out. The proper way to bring the paddle through the water is by rotating the torso. Try keeping the top hand level and moving across the horizon throughout the power phase. This will force you to rotate to bring the paddle along the board rather than pulling your arms. Keep the paddle as close to the board as you can. This will minimize the rotation of the board throughout the stroke.

gtkkslgjkjrtg copy

good1 copy

Recovery Phase of the SUP Forward Stroke

  • The overall length of the stroke will depend on the length of the board. On shorter boards the stroke should go from tip to hip. On longer boards the stroke can be extended back further. Begin the recovery phase before the board starts turning. Begin to remove the paddle at the end of the power phase. Then rotate the torso back to the front thereby setting the paddle up for the next stroke on the same side.

hrjijrijhikjyy copy

good3 copy

Paddleboarding Turns

There are several easy ways to turn a paddleboard. Some of the basic strokes are

  • Side stroke: One way to is simply to paddle on one side until the nose turns in the direction you want to go. Want to turn right? Paddle on the left. Headed to the left? Paddle on the right.
  • Back paddle: A faster way to turn or reverse direction is to simply drag the paddle or paddle backwards on either side of the board. The backwards paddle is a quick way to turn your board around. Simply reverse the direction of your stroke while still facing forward. This will create a 180 degree turn almost completely in place.
  • Sweep Sea (“c”) stroke: Plant your paddle towards the front of the board and take a long sweeping stroke towards the tail. This is sometimes called a sweep stroke.
  • Other tips:
  • Pivot turns: this turn is one of the fasted in terms of changing direction works well especially in surf. Begin by paddling on your dominant side (left foot forward, paddle on your right side). Really bend your knees and put more weight on your back foot. This allows the board to pivot and turns quickly.
  • Stepping back on the board or looking over your shoulder to the direction of your turn also helps in making a turn.These mistakes are easy to make when you’re starting out. Try to avoid them and you’ll have a lot more fun on the water:

  • Common Beginner’s Mistakes in Paddleboarding

  • A hunched posture. Keep your back straight, shoulders level.
  • Staring at your feet instead of the horizon.
  • The elbow (bent angle) of the paddle facing in the wrong direction. It should point away from you.
  • Having both hands on the paddle shaft. Your top hand belongs at the top of the paddle, on the grip.
  • Standing straight-kneed. It’s much easier to balance with bent knees.

Paddleboarding: Next Steps 

Once you’ve mastered the basics, there’s almost no limit to the watery worlds you can explore on your stand up paddleboard. Play in the waves and ocean surf, carve turns or learn new strokes. You might find yourself wanting a narrower, more manoeuvrable board as you become more adept.


How To Wax A Surfboard

How To Wax A Surfboard

HOW TO WAX A SURFBOARD 


Wax has been used for years to help surfers gain traction and grip to their surfboards in water. Traditionally a surfboard is quit slippery in the water and without wax or traction pads I would be difficult to paddle and ride. Most surfboards have a thin layer of wax on the deck. Surf wax applied correctly will create a layer of small waxy bumps giving your feet a grip/traction

The following is a beginner’s guide to waxing your board as well as a tutorial of how to get the perfect traction for your board If you’ve never waxed a surfboard before or you’re just looking for tips to get a better wax job, here is our guide to waxing your surfboard.

Wax types

Choosing the right wax for the job is key depending on the size of the board as well as the temperature of the water will determine what wax you need tropical water, warm water, cool water & cold water are your usual wax names if  you take a cold water wax to warm water, it will be too soft.  But you could use a warm water wax in cold water, but it’s better to get what you need.In the UK the average temperature varies from around 4 C in winter to around 15 C in summer. There for you will need to possible change your wax in the summer and winter. But most of the year Cold water wax is perfect

Wax temperature guide below

How To Wax A Surfboard In 5 Steps

Step 1: What You Will Need 

To wax your surfboard The main thing you will need is some wax remover/white spirit/a rag or cloth/ basecoat wax, topcoat wax and a wax combe

Step 2: Clean The Surfboard 

When starting to wax a surfboard you need to remove any debris, dirt or previous wax to ensure the surfboard is clean to ensure you get proper adherence. If your surfboard is brand new follow step 4

First take the wax combe and start scrape off all of the wax with the straight side of your wax comb. It helps if the wax can be heated up or the board left in the sun to aid this process. Ensure that you remove all wax from rails nose tail & deck using the curved and flat sides of the combe


You will still have a small amount of wax on the board so you will need to use wax remover cleaning product or white spirit that will dissolve any excess wax. Gently rub a cloth over the area to ensure all the wax is gone & wash off the cleaning solution with water.

Step 3 Where To Put Wax On Your Surfboard

The picture below shows a rough guide of were to apply your wax on different types of the surfboard. Other areas include around the rails were you grip the board for duck diving and also all the way to the nose. Also, try to keep any wax off the bottom of your board as that will slow it down making your board less responsive.

Step 4: Applying The Basecoat

The basecoat is the foundation of your grip basecoat wax is harder than top coat and will last longer on your board. It also makes it harder to apply so will require a strong amount of pressure. It will help to create a pattern of bumps on your surfboard that helps the top cote stick easier. The base coat will help to keep your wax on for longer were as applying just topcoat would need to be applied constantly.

Begin by applying broad strokes on the board and continuing until you see a bump pattern emerge. Each surfer is different so try a range of patterns and styles of waxing that works for you


Its a good idea is to start off with criss crosses by going diagonal one way up the board and then go perpendicular to that direction back down the board. Its then a good idea to fill on those criss crosses by either

Front to Back: Rub the wax in a straight line parallel to the rocker and to keep grip when duck diving apply a small amount on the rails close to the nose

Circles: Rub the wax in little circles, moving up and down the board

Front to Back: Rub the wax in a straight line parallel to the rocker and to keep grip when duck diving apply a small amount on the rails close to the nose

Random: doing circular, straight, side to side in a random directions. After doing this for a few minutes “if properly performed “you will see small bumps and lumps begin to appear. Ensure to keep waxing until you have an even and suitable layer of wax.

Step 5: Top Coat 

Now it’s time to apply the top coat of wax. Usually a lot softer in texture and greatly affected by heat changes and water temperature

The top coat is applied in the same way as the basecoat but with less pressure as the wax is softer. Use a similar technique.


Keep your wax sticky for longer 

Once you finished your surf you will want to prepare your wax for the next session. Wax will enviable flake off and get stuck to your wetsuit body and shorts, therefor to keep your board at maximum grip you will need to reapply small amount of top coat before each session. The wax will eventually get flatter and less sticky a great tip if you haven’t got any wax or want a little more grip use the jagged side of a wax combe to scratch some lines in the wax to reveal the fresher wax underneath this will help your wax go further


If you surf a lot and find your wax isn’t doing its job it’s a good idea to go back to the beginning and start a fresh basecoat. On average a new basecoat should be applied every year but if you surf a lot every 3-4 months might be ideal.

Related Posts

The Wave Garden Bristol “First Look”

The Wave Garden Bristol “First Look”

The Wave Garden Bristol “First Look”The Wave Bristol Has released its first short video of the waves produced by wave garden specifically wave garden cove technology and we got say its looks incredible. ever since the first idea of the wave bristol came about we have...

SUP Clinic Chichester By SBS boards & TJ Boards

SUP Clinic Chichester By SBS boards & TJ Boards

We hosted our very first SUP clinic with Partners, TJ boards who are local experts of the Chichester canal. We were lucky enough to have our SUP team rider Narcy who lives in Fuerteventura in the canary island who lives and breast anything water sports.  who is...

How To Paddle Faster!

How To Paddle Faster!

Improving your paddle stroke means catching more waves longer sessions and more fun For anyone starting surfing or even an experienced Surfer will know the feeling of missing a wave by one or two strokes, not quite being in front of the wave as it peels or freaking...

13 Things All Beginner Surfers Need To Know

13 Things All Beginner Surfers Need To Know

If you  are new to surfing or if something you want to try there are some precautions you should definitely take before jumping in at the deep end Here are our top 13 tips for beginners all the things you will need to know to get you started in your surfing fun and...

Epoxy Surfboards are Better For wave Pools?

Epoxy Surfboards are Better For wave Pools?

Whats Better For Wave Pools (EPS Or PU)  If you haven’t been hiding under a rock for the last 2 years then you have probably seen the explosion of wave pool video hit the internet from Kelly's Surf Ranch with endless peeling perfection to BSR Park, N Land in Austin or...

INFLATABLE SUP VS HARD SUP WHAT’S RIGHT FOR ME

INFLATABLE SUP VS HARD SUP WHAT’S RIGHT FOR ME

As technology and development in inflatable and hard boards change this is something to review every few years as it used to be very clear that hard boards rule the waterways and inflatables had no place and no rivalry to the hardboard but today things are very...

TOP 20 Surf Fitness Exercises for Power Strength & Stability

TOP 20 Surf Fitness Exercises for Power Strength & Stability

20 SURF FITNESS EXERCISES FOR POWER STRENGTH AND STABILITY


Surfing as many people know isn’t just a sport it’s a full embodiment of health fitness and balance in your life, keeping fit specifically for surfing provides its own challenges, so we put together a little work out with what we think are the best exercises for improving strength, power and stability. Surfing requires its own special kind of strength training, looking at a surfer’s physique, it requires strong shoulders and arms for paddling out to the waves, and great core strength and balance for riding them back to shore.

The exercises that follow integrate stability, power, and core training to help improve your balance and activate muscles you’re not used to using (the kind you’d have to use on a board). As surfers use their whole body to function as one unit, you will see the majority of these exercises are for the upper and lower body meshed together in one combination move.

Perform the exercises as part of a routine of a circuit, completing one set of each, one after the other. Rest as little as possible between exercises, and 90 seconds to three minutes rest time between circuits.


(1)Overhead walking lunge

888

Exercise Hold dumbbells overhead and brace your abs. Step forward into a lunge, bending your front knee until your thigh is parallel to the ground. Step forward and repeat with the other leg. Each step is one rep.

Surf specific – working you flexibility in your legs, as well as your prime movers on a surfboard strong powerful quadriceps, will help stabilize your self in bigger waves and give you more spring in top turns, whilst isolating the shoulders to hope strengthen them whilst engaging the core.

(2)Dumbbell push up

113

Exercise – Hold a dumbbell in each hand and get into push up position on the ground. Perform a push-up, then return to the original push-up position and repeat.

Make it Tougher – Bring the dumbbell up to your chest and maintain a rigid body position at the top of each press up using alternate arms. Increase dumbbell weight or slow the movement to 4 seconds pushing up 4 seconds going down.

114

Surf Specific – Imitating a similar movement of the pop up as well as using the majority of the muscles in the arms and shoulders to help push your body up whilst keeping your body straight engages the core to improve stability.


(3)Swiss Ball Dumbbell Row

116

Exercise – Hold a dumbbell in one hand and rest your free hand on a Swiss ball. Bend at the hips so your torso is parallel to the ground; keep your back flat. Row the dumbbell to your side. Complete your reps on one side, and then switch.

Surf Specific –balancing some of your weight on the Swiss ball whilst doing the exercise helps to engage your core by keeping you stable same muscles used to balance on a board. Also working the arms and shoulder for extra power when paddling.


(4)Swiss Ball Dumbbell Rotation

777

Exercise – Hold a dumbbell in both hands and lie on your back on a Swiss ball. Rotate your torso as far as you can to one side and then the other. That’s one rep. Maintain straight arms and back throughout the exercise.

Surf Specific – The Swiss ball is used to engage your core and improve your stability, whilst the movement of the exercise mimics that of turning on a surfboard.

(5)Single-Leg Squat

111

Exercise – Stand on one leg and then squat down as low as you can. If you need to, hold on to something for support.

Surf Specific – This exercise test your glutes, hamstrings flexibility foot stabilizer’s balance and core strength as well as the power of your quadriceps, similar to surfing maintain your balance and stability on a board in a manoeuvre whilst being off-balance.


(6)Clap Push-Up

115

Exercise – Get into push-up position and lower your body until your chest is about an inch above the ground. Explosively push yourself back up so that your hands leave the ground and you can clap in midair. When you land, use the momentum to begin the next rep.

Surf Specific – This exercise engages all the prime movers in a pop-up whilst improving your power you get from the spring of your pop.


(7)Prone Swimmer

222

Exercise – Lie face down on the ground and extend your arms and legs. Raise them off the ground simultaneously, and then pull your arms down toward your sides. Repeat, as if you were doing a breaststroke, keeping your arms and legs elevated throughout the set.

Surf Specific – this exercise if a very similar movement to paddling but its main focusing is on lower back muscles stabilizing you when paddling as well as core maintaining your balanced position on the board.


(8)Dumbbell Get-Up

555

Exercise – Grab a dumbbell in one hand and lie on your back on the ground. Raise the weight over your face. Now get up as quickly as you can without using your free hand for support.

Surf Specific – This exercise is a full body exercise using lats, quads, isolating shoulders muscles and engaging in back stability as well as a prolonged core work out all of which will improve posture and stability on a surfboard.


(9)Kneeling Swiss Ball Press

444

Exercise – Grab a dumbbell in each hand and kneel on a Swiss ball. Find your balance and raise the weights to shoulder level. Press them overhead. If that’s too hard, you can kneel on two medicine balls.

Surf Specific – This exercise is working the shoulders as well as the back muscles but by doing it on a Swiss ball engages the smaller stabilizing muscles in the body key for balance and stability on a surfboard.


(10)Swiss Ball Jackknife

333

Exercise – Get into push-up position and rest your shins on a Swiss ball. Keeping your torso straight, draw your knees up to your chest, rolling the ball forward.

Surf Specific – this exercise is predominately a crunching motion using mostly the abdominals, hamstrings and shoulders whilst working all the small stability muscles used in surfing to maintain balance whilst paddling and turning.


(11)New school: Surfer’s Pop Up

226

Exercise – Laying in a prone paddling position on the floor, head looking forward but your hand next to your ribs and push against the floor in an explosive movement, bring your leading foot under your chest whilst twisting you torso PIC(4/5).

Surf Specific – With the Surfer’s Pop Up you can practice getting to your feet more times than during a typical surf session. This practice will help you nail that transition from your chest to your feet on your next paddle out.


(12)Swiss Ball Push Ups

999

Exercise –  Begin by pushing up on a stability ball and the lowering yourself back down. This is an excellent surf-specific movement, because.

Make it Tougher – While doing the ball push up, try raising one foot off the ground for a few reps. Keep your core active and don’t let your body twist. For example, try five reps with both feet on the ground, five reps with your left foot off the ground, and five reps with your right foot off the ground. This movement mimics the feeling of duck-diving and adds a nice core stability challenge.

117

Surf Specific – it builds strength in the chest and arms for paddling and simulates the unstable, wobbly nature of duck-diving. Benefits of these push-ups during tough paddles and whenever you have to perform several duck-dives in a row.


(13)Swiss ball dumbbell Back Extensions

112

Exercise – Begin by lying face down on a Swiss ball with your hands in front of the ball (pic. 1). You Knees should remain slightly bent. With your hands holding on the dumbbells, pull your shoulder blades back and down. Begin to inhale and slowly lift your head and then your chest off the ball. Keep extending until you feel your lower back muscles engage. Hold at the top position for one to two seconds and then slowly exhale and lower down to the original starting position.

Surf Specific – This exercise gives you the ability to hold your chest off your board and is the basis for good paddling technique. It is using your shoulders, neck, and lower back through a simple exercise to build strength and endurance in your back muscles. Increasing the mobility in your paddling position. Whilst also using abdominal muscles to keep the hips in place and prevent hypertension of the lower back.


(14)Dumbbell Wood Chop

118

Exercise – Squatting, weight shifting and rotating your torso occur in almost every surfing manoeuvre. The dumbbell wood chop integrates upper body, lower body, and core training in one movement. Exactly what happens while manoeuvring your board? In addition, the lower body training is fast and explosive, again much like surfing.

Surf Specific – this exercise s great for improving strength in your turns, it engages in you stabilizing core muscles and mimics the movement of a turn in surfing.

Make it Tougher – Increase the weight of the dumbbell, or speed up the wood chop movement as will make a more explosive movement and more resistance to your direction changes.


(15)Knee Tucks

223

Exercise – Start in a press-up position with your hand shoulder width apart, keep your head looking forward throughout the movement. Bring your knee up to your chest until they almost touch, place your foot as flat as possible and as close as you can to your hands. Hold this position for 2-3 seconds then reverse the action to the original starting point and repeat with the opposite leg.

Make it Tougher – Increase the distance of your front foot were a weighted vest or position your hand on a balance board/inboard, or slower movement through the exercise 4 seconds pushing up 4 seconds going down.

Surf Specific – This exercise is the classic beginning stages to the pop and increasing flexibility to help get a better first-time foot placement on the board.


(16)Drop Knee Pivots:

225

Exercise – Start in an athletic stance with knees slightly bent. Hold the handles of the Resistance cord in front of your chest, Lead with your head and shoulders and rotate your body toward the anchor point Reverse the movement, rotating in the other direction. Pivot on your toes. You will feel a stretch in the hip that you are pivoting towards.

Make it Tougher – use cable machines to add more resistance to your exercise whilst maintaining your position using your core.

334

Surf Specific – this exercise is great using a full body movement using all almost all of the muscles used to do a turn in surfing. When doing this exercise, visualize the sequence of a surfing turn: Head, shoulders, hips, board.


(17)High Elbow Row

227

Exercise – Stand with tall posture and your feet shoulder-width apart. Grasp the handles and straighten your arms in front of your shoulders. Pull your elbows back, squeezing your shoulder blades together. Pause for a moment, and then return to the start position. This movement helps get your arms out of the water as you recover back to the entry phase.

Make it Tougher – use cable machines to add more resistance to your exercise whilst maintaining your position using your core.

338

Surf Specific – This exercise engages predominately, your core and foot stabilizers maintaining pressure and balance through muscle contractions in a similar way to balancing and changing direction on a surfboard. It also engages the shoulders, triceps and biceps which are a prime mover in paddling.


(18)Standing Pull

228

Exercise – Stand with your feet shoulder-width apart, knees slightly bent, back straight, with a hinge at your hips. Have your hands in the handles in front of your shoulders. The top part of the movement simulates your hand entering the water. Have your palms down and wrists slightly flexed. Keep your elbows slightly bent as you simulate catching water and propelling your surfboard. Pull to your hips and hold for a moment, keeping your shoulder blades pulled down and back. Keep resistance on the bands as you reverse the motion, and then repeat.

Make it Tougher – using a cable machine to add more resistance and increase the power need to complete the movement.

337

336

Surf Specific – This exercise’s main focus is to imitate a similar movement to paddling; it engages the shoulders, triceps and biceps which are prime movers in paddling. It also engages predominately, your core and foot stabilizers maintaining pressure and balance through muscle contractions in a similar way to balancing and changing direction on a surfboard.


(19)One Arm pull down

335

Exercise – Stand with your feet shoulder-width apart, knees slightly bent, back straight, Have your hand in the starting position and pull the cable down until your arm is by your hips your side(maintaining the original body position your shoulders). The top part of the movement simulates your hand entering the water. Have your palms down and wrists slightly flexed. Keep your elbows slightly bent as you simulate catching water and propelling your surfboard. Pull to your hips and hold for a moment, keeping your shoulder blades pulled down and back. Keep resistance on the bands as you reverse the motion, and then repeat.

Make it Tougher – increase the resistance of the weight, or slower movement through the exercise 4 seconds pulling down 4 seconds going up.

Surf Specific – The top part of the movement simulates your hand entering the water This exercise main focus is to imitate a similar movement, it engages the shoulders, triceps and biceps which are prime mover in paddling, but predominately, your core and foot stabilizers maintaining your rigidity in the stance, similar to paddling and maintaining an upright prone paddling position on a surfboard.


(20)Alternating Overhead Press

666

Exercise – hold dumbbells in starting position at shoulder width, arms at right angles. Alternative repetitions pushing the dumbbells above your head, then returning to the original shoulder position whilst maintaining a straight back.

Make it Tougher – increase the resistance of the weight, or slower movement through the exercise 4 seconds pushing up 4 seconds going up.

Surf Specific – This exercise is working the shoulders and the back muscles as well-being similar in movement to paddling and increasing the overall strength in the arms and shoulders for paddling.


Disclaimer: The information found within this site is for general information only and should not be treated as a substitute for medical advice from your own doctor or any other healthcare professional. SBSboards.com is not responsible or liable for any diagnosis made by a user based on the information shown within this website. Always consult your own GP if you’re in any way concerned about your health.

Related Posts

The Wave Garden Bristol “First Look”

The Wave Garden Bristol “First Look”

The Wave Garden Bristol “First Look”The Wave Bristol Has released its first short video of the waves produced by wave garden specifically wave garden cove technology and we got say its looks incredible. ever since the first idea of the wave bristol came about we have...

SUP Clinic Chichester By SBS boards & TJ Boards

SUP Clinic Chichester By SBS boards & TJ Boards

We hosted our very first SUP clinic with Partners, TJ boards who are local experts of the Chichester canal. We were lucky enough to have our SUP team rider Narcy who lives in Fuerteventura in the canary island who lives and breast anything water sports.  who is...

How To Paddle Faster!

How To Paddle Faster!

Improving your paddle stroke means catching more waves longer sessions and more fun For anyone starting surfing or even an experienced Surfer will know the feeling of missing a wave by one or two strokes, not quite being in front of the wave as it peels or freaking...

13 Things All Beginner Surfers Need To Know

13 Things All Beginner Surfers Need To Know

If you  are new to surfing or if something you want to try there are some precautions you should definitely take before jumping in at the deep end Here are our top 13 tips for beginners all the things you will need to know to get you started in your surfing fun and...

Epoxy Surfboards are Better For wave Pools?

Epoxy Surfboards are Better For wave Pools?

Whats Better For Wave Pools (EPS Or PU)  If you haven’t been hiding under a rock for the last 2 years then you have probably seen the explosion of wave pool video hit the internet from Kelly's Surf Ranch with endless peeling perfection to BSR Park, N Land in Austin or...

INFLATABLE SUP VS HARD SUP WHAT’S RIGHT FOR ME

INFLATABLE SUP VS HARD SUP WHAT’S RIGHT FOR ME

As technology and development in inflatable and hard boards change this is something to review every few years as it used to be very clear that hard boards rule the waterways and inflatables had no place and no rivalry to the hardboard but today things are very...

THE 10 MOST EXPENSIVE SURF FILMS EVER MADE

THE 10 MOST EXPENSIVE SURF FILMS EVER MADE

THE 10 MOST EXPENSIVE SURF FILMS EVER MADE

1. Storm Surfers: $5 million. 

3. The Endless Summer II: $3.4 million 

3. The Ultimate Wave Tahiti: $3 million. 

4. Step Into Liquid: $2.5 million.

6. Blue Horizon: $950,000

6. Blue Horizon: $950,000

7. Free As A Dog: $850,000

8. Young Guns II by Quiksilver: $650,000. 

“That boat alone is around 160k… then throw a chopper on it!” revels Kai Neville. Indeed, those were the glory days. Quik’s Young Guns was the strongest squad in the business. A frisky, puka shell-wearing Jules Wilson, an engaged Dane Reynolds, a supporting cast of Jeremy Flores, Clay Marzo, Troy Brooks and Ry Craike —all mentored by one Robert K. Slater — how absolutely all-star. Of course, that was before the financial apocalypse of ’08. Before Quik shed employees like a snake sheds its skin. But damn, flat screens in your own private cabin with a helo parked on the deck, that’s Kanye shit.

9. Scratching The Surface: $650,000

10. Who Is J.O.B.: $450,000

Related Posts

The Wave Garden Bristol “First Look”

The Wave Garden Bristol “First Look”

The Wave Garden Bristol “First Look”The Wave Bristol Has released its first short video of the waves produced by wave garden specifically wave garden cove technology and we got say its looks incredible. ever since the first idea of the wave bristol came about we have...

SUP Clinic Chichester By SBS boards & TJ Boards

SUP Clinic Chichester By SBS boards & TJ Boards

We hosted our very first SUP clinic with Partners, TJ boards who are local experts of the Chichester canal. We were lucky enough to have our SUP team rider Narcy who lives in Fuerteventura in the canary island who lives and breast anything water sports.  who is...

How To Paddle Faster!

How To Paddle Faster!

Improving your paddle stroke means catching more waves longer sessions and more fun For anyone starting surfing or even an experienced Surfer will know the feeling of missing a wave by one or two strokes, not quite being in front of the wave as it peels or freaking...

13 Things All Beginner Surfers Need To Know

13 Things All Beginner Surfers Need To Know

If you  are new to surfing or if something you want to try there are some precautions you should definitely take before jumping in at the deep end Here are our top 13 tips for beginners all the things you will need to know to get you started in your surfing fun and...

Epoxy Surfboards are Better For wave Pools?

Epoxy Surfboards are Better For wave Pools?

Whats Better For Wave Pools (EPS Or PU)  If you haven’t been hiding under a rock for the last 2 years then you have probably seen the explosion of wave pool video hit the internet from Kelly's Surf Ranch with endless peeling perfection to BSR Park, N Land in Austin or...

INFLATABLE SUP VS HARD SUP WHAT’S RIGHT FOR ME

INFLATABLE SUP VS HARD SUP WHAT’S RIGHT FOR ME

As technology and development in inflatable and hard boards change this is something to review every few years as it used to be very clear that hard boards rule the waterways and inflatables had no place and no rivalry to the hardboard but today things are very...

[]
×
GET £10 OFF YOUR ORDER

Get a discount in your email!